
Installing a Detroit Locker
Page 2 of this Article
Remove Differential Article
Replace U-Joint Article
© Copyright 2000 - 2008 Chuck Kopelson 04/21/2005
Updated April 19, 2016
So you've finally made the decision to install a Detroit locker in your truck. Realize that this is not a job for a beginner. There are actually two jobs involved. One is the removal of the differential from the truck and the other is actually installing the locker. You can further break down the job of installing the locker into two parts. One is disassembly and renovation of the differential. Two is bolting in the locker and correctly setting up the differential. If your diff is in new shape and correctly setup to begin with the job would be fairly easy although you would still need some special tools like a case spreader and a press to take apart the diff.
Since you are going to a lot of trouble removing the diff you might as well replace all the bearings and seals. Once you make this decision the job takes on an additional level of difficulty. You will now have to 'setup' a rear end. This is the process of correctly shimming the ring and pinion so they mesh correctly. If you don't do it correctly It will cause all kinds of problems which will shorten it's life and decrease the dependability of your differential. This is the kind of job that is best left to a professional with experience.
I thought my diff was in very good shape since it only had 18,000 miles on it. After looking at the pictures below you will see for yourself that there is a need for a machine shop. After examining the whole process I decided to send my diff out to a professional shop to rebuild it right. Believe me, you don't want to be taking the diff in and out of the truck. It's a real 'pain'.
Parts and tools needed:
- Detroit SofLocker
- Input Seal*
- Output Seals (2) *
- Output Star Seals (2) *
- Front Pinion Bearing Set*
- Rear Pinion Bearing Set*
- Carrier Bearing Set (2)*
- Output Bearings (2)*
- Ring Gear Bolts (8)*
- Locknuts (3)*
- Pinion Crush Sleeve*
- Pinion Depth Shims (as required)
- Carrier Shims (as required)
- 2 quarts of gear oil
- Permatex Ultra Black Sealer
- Locktite Red threadlocker
(*) items included in overhaul kit
Tool list:
- Dial indicator (flexible stand preferred)
- Case spreader
- H Press
- Bearing Separator
- Seal removal tool
- High torque impact wrench
- Impact sockets (3/4”, 13/16”, 1 1/8”)
- Torque wrench (capable of 150 lb-ft)
- Beam type torque wrench (in-lb)
- Bearing removal and installation tools
- Good selection of hand tools
A note about shims:
We have found that the only place to get the proper shims is from AMG. Since the shims cost somewhere around $3-5 each and there are so many to choose from, They are not included in installation kits (otherwise a simple install kit would cost somewhere around $700 - $800!) Should you decide to do an install yourself, we would recommend you disassemble your diff, measure the original shims, and order a few larger and smaller ones from AMG to be safe.
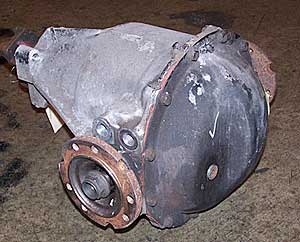 The differential as received. It appears to be a 1999-01 unit. I noticed a fair amount of corrosion which indicated to me it was either used in a northern climate or it had been out in the weather. It is mostly surface corrosion and will clean up rather easily in our cleaning machine.
It is in fact a 2000 with 18,000 miles from the Chicago area.

After an initial external cleaning, the unit is taken to the bench for teardown.

After removing the output flanges, the cover is removed. Because of the time spent in the cleaning machine, the inside of this one is already clean and dry making disassembly much easier. Note the excessive amount of sealant. Untouched factory units usually do not have quite this much. This tells me that this unit may have had the cover off before and I should pay closer attention. It may not mean anything, but normally covers aren’t removed unless a problem is suspected.
 Next, the output seals, stub shafts and output bearings are removed from the housing. This can be done using several methods, such as with a slide hammer. The output seals are normally a pretty tight fit in the housing and can be rather difficult to remove. The seal, stub shaft and bearing will come out as a unit. If you do not have access to a slide hammer, you can use an old output flange. Attach the old output flange and hit it on the inside surface with a hammer until the seal and shaft come out. Do NOT do this with a flange that you intend to reuse!
 After removing the bearing caps from the carrier bearings, I attach the case spreader and prepare to remove the carrier. Spreading the case allows me to get the carrier out without damaging the aluminum housing. Pry bars should never be used to remove the carrier. A dial indicator (not shown) is attached to the case spreader to determine how much the case is spread. Do not exceed .020” or you will risk damage to the housing. Below shows the inside of the housing after the carrier has been removed.


This is the Torsen T2 unit with the ring gear still attached. Unbolt the ring gear from the carrier.

The rear of the diff showing the yoke removed
Now I am ready to start disassembling the pinion side of the differential. First remove the yoke and then the input seal.

Rear Pinion Yoke
 The pinion gear Input seal is removed from the rear of the diff case. The front pinion bearing is visible.This bearing is a press fit onto the pinion and can make the pinion difficult to remove from the housing. An H Frame press works well for this.


This shows the case from the inside where the pinion gear was. Shown is the rear pinion bearing cup/ race. There were a couple of badly scored spots on it. This was likely causing some noise and may explain why the cover had been removed previously. Perhaps since this problem is not an obvious one to find without complete disassembly, the cover was replaced thinking that the source of noise was elsewhere. As with the rest of the bearings in the differential, these are always replaced.

The rear pinion bearing race has been removed. The shim for setting pinion depth is located here underneath where the race goes.

These shims are available from AMG and range from .084” to .112” in increments of .001”-.002”.

This is the pinion gear as removed from the housing. The rear pinion bearing is pressed on and will need to be removed with a press. The infamous crush sleeve is shown as well. The crush sleeve just sits loosely on the pinion. No pressing required for removal.

Removing the front pinion bearing
Both output Flange Sealing Surfaces were heavily scored.
Both of the output flange seal surfaces showed quite a bit of wear. Considering the corrosion present on the rest of the unit’s external surfaces, I was not very surprised to see this. This will need to be addressed or the output seal will not be able to keep the fluid in the diff for very long. After determining that the damage was not as deep as it appears, I mounted the flanges in the lathe and lightly reground the surfaces. We have used this technique successfully for years and it works well on halfshaft sealing surfaces too. I only had to remove .005” from the diameter to get these surfaces back to serviceable condition. Removing much more than this, however, will cause the diameter to be too small to get a good seal. IN that case, the flanges will need to be replaced at about $120 a pop.


I like to hit all the mounting threads with a tap. This makes for an easier install for the end user by cleaning out old Loctite and debris. We have used Heli-coils to repair stripped threads with great success.
