
CTI Trouble Shooting
CTI Quick Disconnect Repair Article
Updated February 3, 2022
Are Your Tires Going Flat?
The best way to check for leaks is with a spray bottle full of soapy water. Check the tires for nails and the rims for leaks around the wheel edges. Spray the cti lines and fittings. Remember that the 2 front wheels and the 2 rear wheels are joined together in the cti system. If you are losing air in the front it could be either tire, or either geared hub seal, any of the cti lines leading back to the manifold, one of the solenoids, the over pressure valve, the lines leading to the in cabin pressure gauge, the air compressor or any of the air lines or fittings in the system.
What I do to isolate the problem is inflate the tires using the cti to normal pressure. Pull both disconnects at the wheels. let it sit and see if the pressure gauge is reading pressure. You may have to let it sit overnight. If it the gauge drops to zero your leak is somewhere in the cti lines that feed the wheels or the geared hub seal.
If you do have pressure at the gauge then reattach the quick disconnect to the front left wheel. Inflate the system to the correct pressure. Wait enough time for the air to escape. If you are loosing air then the leak is in the tire you have attached to the system. In this case the left. Re-inflate the system and pull the left cti and reattach the right cti and check again. It's not impossible for there to be leaks in more then one place.
If you can't find the leak then all you can do is wait. It will usually get bad enough to detect.
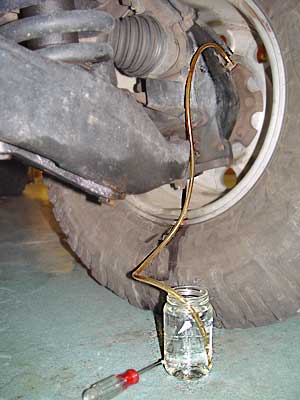
To check if the seals in the geared hub are leaking you have to pull the rubber tube off of the geared hub vent. Then push a length of tube onto the geared hub vent fitting. Take the other end of the tube and put it under water. If you see bubbles you have a defective hub spindle seal. Check out the article on replacing hub seals.
 It's been two weeks and my front was still loosing about 7 to 10 psi every night. I finally decided to take apart the solenoid valves on the manifold of my 98. The coils come off by removing the 9/16 nut on the top. The 2 outer solenoids come apart with a a 7/8"deep socket. The center valve requires a .deep well 1-3/16 socket. I didn't realize that a 1-3/16" deep socket was not standard. All my sets went from 1-1/8 to 1-1/4. I went over to Sears figuring I could just pickup a socket. No dice. They didn't sell it separately. It only came in a 50.00 kit filled with sockets I already had. I went on the internet and found that Snap-on wanted 42.00; no way. I found an S&K socket for 14.00. When I went to check out the freight was 9.00 and they added a 5.00 handling charge. I didn't buy it. I decided to hit a local auto supply. They didn't have the size in a regular socket but in the specialty tools section I found what I was looking for. It's a 1/2" drive deep GM 1-3/16" Oil Sender Unit Socket. It cost me 8 bucks.
Two of the 3 valves I took apart were a real mess. They were full of dirt and sand. I cleaned them up and oiled them with some air tool oil. The front now seems to hold air.
No such luck. I came down in the morning and my front was down 8 psi again. I sprayed soap water all around again and couldn't see any bubbles. I checked my maintenance records and found that I had replaced the front left spindle seal a year ago but the front right had never been replaced.
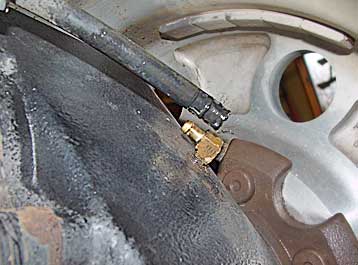
I replaced the spindle seal and the truck seemed to be holding air. When you do a seal you have to remove the steel braided CTI hose that goes into the hub. Then you have to turn the front wheels to get at the bolts. When I removed the CTI line the swivel end seemed a bit loose. After I replaced the seal the truck held air fine and I thought I had finally found the leak.
 2 days later and the darn thing is still leaking air. Since it seemed to hold air while the wheels were turned I took a hard look at the braided air line where it goes into the hub on the right side. I sprayed the swivel end with soap water and guess what. It was leaking. When the wheel was turned it kept the swivel from leaking.
I got a new hose from AMG for around 40 bucks. It was a real pain to install. The hose runs from the hub to a brass T above the front differential. There are 2 large hose clamps that wrap around the CTI hoses and the frame. You have to hope you can get at the clamps with a screwdriver to loosen them. Loosen the clamps but don't undo them or you will never get them on again. Remove the CTI line from the hub and pull it through the A arm and let it hang. The CTI hose that went into the T was in so tight I couldn't get any kind of wrench onto it well enough to turn it hard. I had to undo the front left cti line which allowed me enough slack to pull the whole T down from above the diff. The darn thing was so tight heating it up with a torch didn't help. I ended up cutting the braided line off at the end of the swivel, taking my impact wrench with a deep socket and hammering it off.
looks like that finally fixed the problem. No more leaks.
Has your CTI (central tire inflation) inflate / deflate stopped working?
By Gil Herman
How to Diagnose:
- Run a jumper from battery positive terminal to compressor to rule out failed motor. If OK, then:
- Examine the 5-amp fuse in the main interior fuse panel. Upper panel, position 1G. If OK, then:
- Examine 40-amp fuse; be sure to pull it out. If OK, then:
- Remove relay; jump the lead going to the compressor to the hot lead coming in from the harness. If OK, then: replace the relay. The low voltage circuit is most likely out. You could verify that 12 volts are delivered.
- If all the above are done, you should have identified your problem by the end
- Once the compressor works, by jumping and replacing the problem components, hit the switch. If it does not work it's probably a bad switch or harness. I would either jump the switch or just replace.
- Upon getting the compressor to work, try the deflate. In my case when I hit the deflate I immediately blew the 1G mini fuse. I replaced the mini fuse, disconnected the deflate wire harness and placed a multi meter. I then hit the deflate switch and found 12 volts. I then replaced the solenoid to the deflate valve. This fixed my problem.
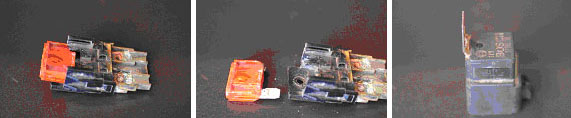
Good 40A Fuse? ------------ Bad 40A Fuse ----------- CTI Relay
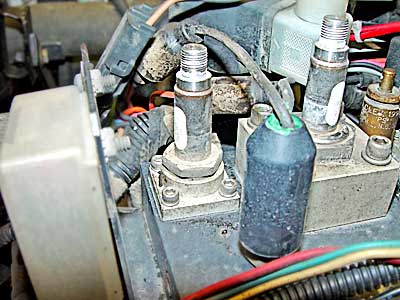
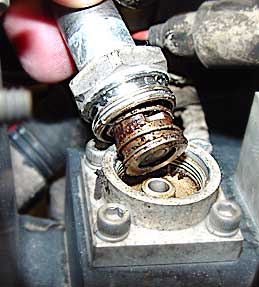
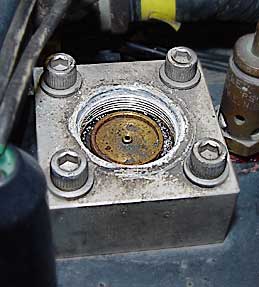
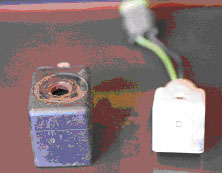
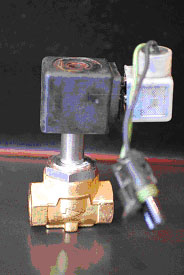 Troubleshooting a Valve On the left is a picture of an old valve from the 96. The valves have an electrical component which is a Bakelite plastic solenoid coil. When power is applied to the coil it energizes the valve which magnetically opens and closes the air passage in the valve. The coil can be removed from the shaft by removing the retaining nut. In my case, it took a pry bar to pull it up and off. It was frozen to the stem. Once removed the actual valve mechanism can be serviced. I have the early 1996 style manifold where each valve is an individual unit connected to each other by pipes. With the solenoid removed, you can get a wrench into the tight space and remove the top of the valve housing. Inside there is a bullet shaped plunger with the tapered end seating into the valve housing. It will move up and down the shaft when the electrical coil is energized. Opening the housing allows you to clean out debris that plugs up the valve.
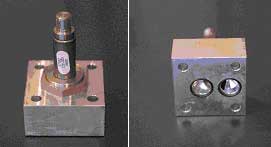
Schematics
CTI Parts for 1996
- Relay is from a 1989 Buick Regatta, Filko RL 246
- 40 amp fuse and holder was replaced with a 40 amp circuit breaker
- Deflate solenoid was purchased from AMG for $265.00 but if you can wait 6 to 8 weeks, they come from
CTI Pump Repair
What will happen with this type of motor design is the brushes eventually stick. They are placed in a pot metal housing without any lube or apparent metal finish where the brushes slide against. The metal appears to be raw and un-treated without any protection from corrosion. After ten years of use mine did just that, corrode and impede the ability of the brushes to slide freely. Not bad for the compressor being exposed to the elements regularly (water, mud & sand).
If the pump is leaking air between the body and the head you may be able to refinish the mating surfaces of the parts and seal the leak.1. Take a piece of optically flat glass. Great source is the glass from a copier or scanner (a better one). Window glass is usually not flat enough unless it is 1/4" thick or more.
2. Take some very fine sandpaper, wet type. (perhaps between 200 and 600 grit.)
3. Take some oil.
4. Spread a film of oil on the glass.
5. Spread a film of oil on the back of the sandpaper.
6. Push the paper on the glass, get out all bubbles.
7. Now oil the top, grit side of the paper.
8. With careful circular motions, rub the mating surface to be cleaned up on the sand paper. Ever three or four 'rubs' rotate the item 90 degrees.
9. constantly monitor your work to be sure that you are cutting evenly.
10. always try to apply pressure evenly. That means pressing on the center of the object, not edges. Avoid rocking!
I'm not saying this will work first time, every time. However, I have resurfaced the mating sides of several alloy castings this way with good success.
CTI Pump Replace
Thomas Industries TA-4101-DC Download the service instructions pdf
The Thomas industries (now DBA as Gardner Denver Thomas) is the one used in the Hummer. You can get a "genuine" compressor from Hummer for more than 1200.00 dollars or you can find one at a distributor for 879.00 to 1200.00 (2011). Grainger’s catalog has the TA-4101-DC listed as their stock number 2KFU8 (Thomas P/N 270025) at a cost of $1208.00.That's a lot of money for a little 12 volt compressor. There are 3 service kits for the TA-4101-DC. A quote for the Minor Service kit and the Brush kit for those two alone cost $400 from Carolina Fluid Components and they quote a 4 month lead time just for the brush kit (2011).
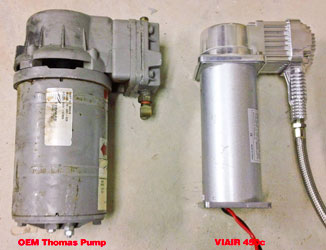
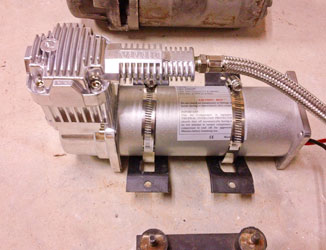
4wheel drive vendors carry all kinds of 12v compressors for 4wheelers so they can air down when going off road. The Hummer is the only vehicle with ctis which is a real convenience. One of my readers did some research and came up with what he believes is an acceptable substitute compressor. It appears to have equal performance characteristics, is approx. the same physical size, provides 100% duty cycle, operates on 12 VDC, and draws 19 Amps. Here is the tech data sheet and dimensions for the VIAIR 450C compressor. It was purchased from 4wheelonline.com for $215 and free shipping (2011). There will be some minor sheet metal work to adapt it to the existing compressor mount. Center to center dimensions for the mounting bolts is different but I don’t foresee that as being a problem. The output orifice on the VIAIR unit exits the rear side of the compressor cylinder pedestal so some minor rerouting will be necessary for the line to the CTIS manifold.
Upon completion I see no difference in operation compared to the original compressor. It is a very simple installation. I used the same base mount to secure the compressor motor to the existing CTIS compressor mount. It required two 3 inch compression clamps replacing the larger existing ones because of the reduced diameter of the Viair's motor housing.
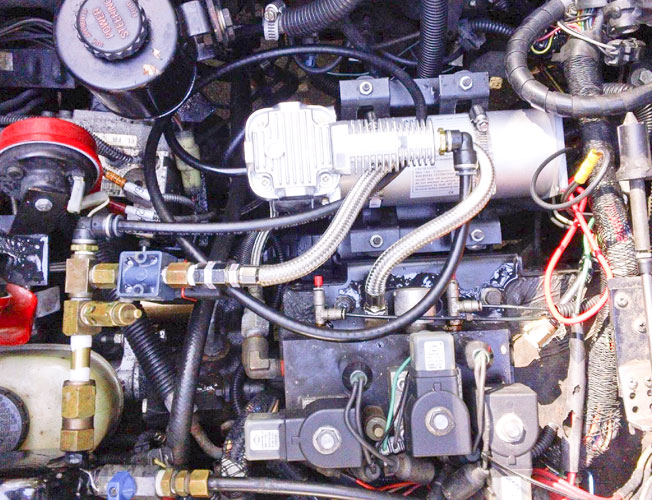
This system has been modified somewhat to provide compressor output to the trucks air horn and horn reservoir tank. A 12 volt one way solenoid valve is inserted to divert air to either the CTIS manifold, or to the horn reservoir tank when needed. When the tank reservoir falls below 55 PSI the compressor is switched on and the air is allowed to fill the tank. When tank pressure reaches 110 PSI the pressure sensor for the tank turns the compressor off. Whenever, I want to inflate or deflate the tires, the solenoid valve is activated by relay switching and the compressor air is diverted to the CTIS manifold.
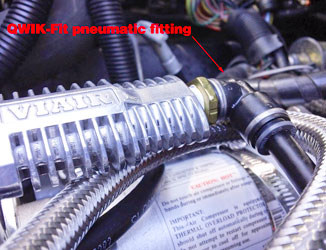
Because of the air horn setup I had to move the check valve supplied with the compressor from the compressor output to the input side of the TEE connection. This isn't necessary for a stock system. The Phillips QWIK-FIT pneumatic fittings I used are ideal for this type of installation.
Another thing I found very annoying was trying to use the AM General braided air hose connection from the compressor to the CTIS manifold. Neither side had a swivel fitting that would allow installation of the hose. Fortunately, the hose that came with the new compressor has a swivel fitting on one end. The air intake line needed to be about 8 inches longer to reach the input port of the compressor which now faces the front of the truck. I lengthened it by inserting a length of 3/8 inch diameter hose into the existing air line.
Update on CTI Pumps
The 2002 uses a proprietary Thomas Compressor TA-3051-DCX. Apparently the 3051 is a 1/4 horsepower compressor that is normally AC only and Thomas made a DC motor for it, so the compressor rebuild kit SHOULD work. I have ordered it, but not yet received. NORCAL Controls sells it way cheaper than Grainger $222, vice 300+. Additionally, NORCAL sells the TA-4101 (brand new entire compressor) for about $675. Their phone number is 408-435-0400, ask for Shelly. If the rebuild kit looks any different than the parts in my unit, I will return the rebuild kit and just get the all new TA-4101 and replace.
My CTI Gauge isn't working
The is a very small orifice between the gauge and the T-fitting that often gets corroded up. Cut out the old orifice and install the new one. Sometime one can get away without installing new tubing if this procedure has not been previously performed on your vehicle. The orifice is there to prevent the needle on the gauge from bouncing when the pump is running.
You will need:
AMG p/n 6007670 Orifice (1 pc.)
AMG p/n 6000258 Tubing (1 pc.)
You should be able to reuse the connectors if you have a 1998 or newer H1.
