
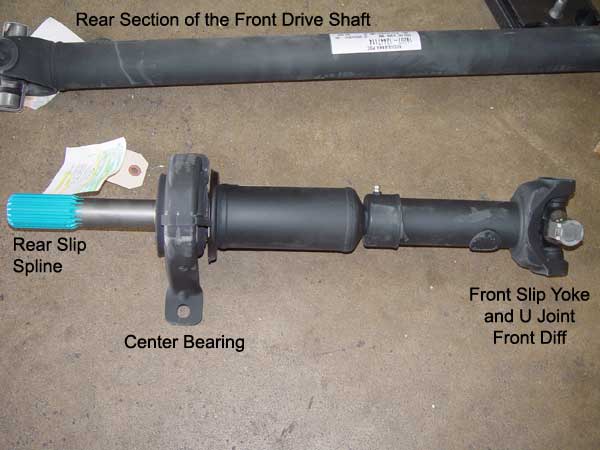
Front Drive Shaft Center Carrier Support Bearing
Updated April 18, 2010
The first symptom of the bearing going was a burning rubber smell like a belt was loose and slipping. Others have reported that they were hearing a whine/whir that I could never locate, but could only hear it between 1-20 MPH. I was beginning the first leg of my August 2002 Colorado trip and exited the highway in Frisco on my way to down to Alma and Mosquito pass. I pulled over and checked the belt on my 98td wagon and it was fine. I wheeled for a few days and worked my way down to Southern Colorado and stayed in Ouray. After about 8 days of 4 wheeling I began to notice a small shake in the front end while driving down the main street in Ouray. When I returned to the motel I crawled under the truck and discovered that the front drive shaft had about 1/4" up and down play at the center bearing.
There are 2 primary causes of failure. Wear and pulling (not winching) from the front which causes twisted front propeller shaft tubes.
If I had known I might have prolonged it's life by removing the 'U' shaped horseshoe bracket holding the bearing to the truck and lining it with a strip of scrap rubber. This would firm up the rubber block that holds the bearing to the truck and reduce flex. See the picture below.
In my case the bearing was going bad due to the fact that it was heating the rubber up enough to burn. I was leaving for home the next day so I figured the driveshaft would be in constant tension while highway driving so it would stay in the same place and not shake around.
Well, I was wrong. We took off early the next morning and after traveling about 10 miles the first indication that something was very wrong was the stench of burning rubber. Another 10 miles and the vibration started. It got pretty violent and I almost pulled over in the middle of nowhere. I got lucky and was able to nurse the truck into Montrose where I pulled over in a parking lot. I always carry tools so I removed the undercarriage protection and pulled the drive shaft off by disconnecting the U joints. The bearing was totally destroyed. There were no balls left and the carrier was a mangled mess. The rubber that surrounds the bearing was burned.
I simply put the truck into 4 High Lock which locks the front and rear drive shafts together and drove all the way back home to Illinois in 2 wheel drive. The truck won't move if you put it in 4 H because the full time 4wd transfer case will route the power to the path of least resistance which is the front since it's disconnected.
Just an aside. Some owners have proposed that if you could put your Hummer in 2wd it will improve the on road drivability, improve fuel economy and reduce wear. In my opinion, based on driving in 2wd all the way from Montrose CO to Chicago and around town for a couple of weeks before I got around to replacing the shaft there was no difference in handling (on the road) or in fuel economy. Because you can't unlock the hubs (if you could you wouldn't have brakes), most of the front drive train is turning anyway so you don't really save that much in reduced friction. You will save some wear and tear on the transfercase chain but you might make it up in increased wear on the rear drive line. The Hummer was designed to split the driving force between the front and rear. Since it is now driving the total weight of the truck it's probable that the rear drive train may experience increased wear.
The U joints, slip joints, and the carrier bearing itself should not have any play at all. However, you can get some play between the rubber cushion around the bearing and the frame, as the rubber will compress over time. If you can shake the drive shaft up and down more then 1/4" I'd start watching it. Like I said above this is not a big deal and can be repaired by using a piece of inner tube or other rubber to make a shim to go between the cushion and the frame.
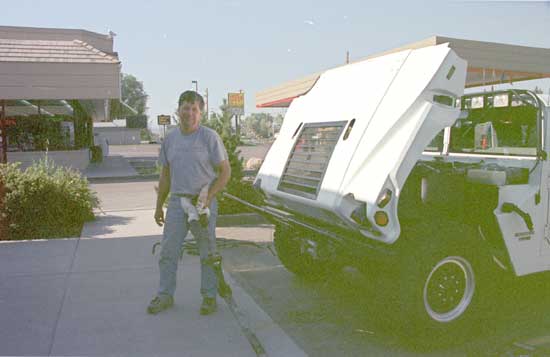
I learned the hard way. Here's me after I had to pull over in a parking lot in Montrose CO after the center bearing self destructed. At least it was a beautiful day to work.

Here's the blown center bearing. The race was destroyed and all the ball bearings were lost. Notice the rubber cushion that used to surround the bearing. This is where you can try shimming the rubber bushing. Cut some rubber the same width as the bushing and lay it on top. Replace the U cap and see if it takes the slop out of the joint
How to Replace the Center Bearing
Here are the Spicer part numbers for some of the items you list below. I would stay with Spicer, which is OEM, rather than using the Chinese variants that you will find at A-Zone or Napa.
U-Joint (all) - 5-213X
Differential Yoke - 2-4-7031-1X; Believe it or not, but the dealer has the best deal on these.
Center Bearing (Front Driveshaft) - 211415X
I've got considerable up-and down play in my carrier bearing, which also needs to be shimmed as it's rattling around in the U assembly.
This is how it is supposed to be. If the bearing is bad, then change the center bearing. If the mounting rubber around the bearing has lost its tension, i.e. the bearing wobbles when you move the driveline up and down, you may only need to shim the rubber with strips of rubber inner tube.
I changed the center bearing on my 98 without a press. If a press is close by it would be a plus, but not necessary. The procedure is not entirely correct in the manual, because it says that the driveline is to be removed out the rear over the transfer case - sorry, no way.
The following assumes you have no underbody protection or it has been removed.
Before you start, clean the accumulated grease, mud, from underneath the truck and the driveline. Block the wheels, but have enough room so you can move the hummer forward or back a bit if need be to gain access to the u-joint bolts. Put the transfer case in 'N.
Remove the front and rear u-joint bolts (I believe 8 mm 12 point heads). I suggest taping the u-joint caps with tape (even duct tape works) once you remove them from the yoke. The ideas is to avoid having the bearing caps fall off and needle bearings dropping out. Remove the two bolts that hold the center bearing carrier. I was able to remove the front driveshaft by just pushing it back a little bit and the flexing the center u-joint.
Couple of things about the center bearing/ front prop shaft - the joints are out of phase from the factory by 27.5 degrees. The phasing is how the yokes on each end are aligned. The long rear section of the front drive shaft has the yokes welded on with the offset. On the front, one of the slip joints is not keyed, so mark it before you change front joints. The slip yoke that attaches to the front diff should be in phase with the one at the transfer case.
On the rear drive shaft the yokes are welded into the
tube, so you can't screw up alignment there.
Once the driveline is out, support the center section in a vise. I don't know if it's important, but I marked the driveline so that I would put it back together over the same splines. Next, pull the two end sections of the driveline apart by sliding them off the splines. The grease retaining caps are a bit stiff, but they will slide over the splines.
Remove the rubber support and the rubber from the bearing - the rubber slides over the bearing.
I found that with a couple of large screwdrivers I was able to slide the securing ring from the shaft. A bit of light tapping was needed, but it wasn't on very tight. The correct way to remove the bearing is with a bearing 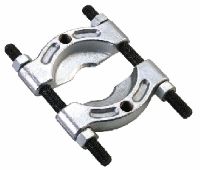 splitter /separator. I've seen them on Ebay for 20 bucks. They are esentially 2 curved wedged halves that force the bearing down from it's seat. If you don't have a puller you can try to remove the bearing by driving it off with a 9" drift punch - striking one side then the other. This took about 10 mins. It was a bit tight at first to get a good strike from around the slinger ring, but it just takes patience. If I had a press and press collar this part would have been easier.
Installation was the reverse procedure. I used a piece of 1 1/4" pipe to drive on the bearing and retainer ring. Go slow and easy by tapping it with a hammer. Trash the pipe later. The grease caps slide on with a good push.
Don't forget to grease the shaft after installation.
