
How to Replace Geared Hub Output and Spindle Seals
Tools and Parts List
Input Seal Repair Article
Geared Hub Internals Repair
Updated December 24, 2012
 Last time I did an oil change and grease I was greeted with the beautiful pattern of oil spray on my right rear tire. I took the wheel off the truck and saw that the oil was dripping down from behind the hub (plate with the wheel studs) and collecting on the lower ball joint nut where it finally dripped down onto the spinning wheel. When I discovered it the hub was only about 1/4" low on oil. This is a classic output seal leak.
If your tires are going flat you may have a bad spindle seal. This is the seal that allows the hub to turn while holding the air in the cti system. Pull the breather line at each hub and check for air leaks. Stick a short piece of hose on the geared hub breather fitting and put the other end under water. If it bubbles you have air leaking from the cti system into the hub.
The job should take you about 1.5 to 2 hours if everything goes right.
A tip from the military.
The material seals are made of really doesn't stay overly plyable long when mated to 90w or synthetic and not used on a daily to weekly basis. Pull your halfshaft and spindle, inspect the mating surface of the seal and if it seems in good to better then shape (no gouges, runs, or missing material) reach in behind the seal lip and pull out the spring that holds the form of the lip.If you look closely at it you will notice the spring actually screws in nose to tail. Unscrew it, take a fine or very sharp set of wire cutters, nip off about 5 or 6 coils on the tail side and screw it back together. Put it back where you got it from and make sure it is seated. Clean your parts off making sure no dirt or junk is on the spindle surface and seal mating surface then reassemble. It will save you bigger problems down the road especially if you're out in the woods, maybe a little money, or if you caught it soon enough a bigger leak and complete blowout of the seal. This will work for the input and output seals the same.However much I would like to take credit for these two fixes believe it or not they are both found in the BDAR manual for the HMMWV
 Jack the truck up with a floor jack under the A arm at the lower shock mounts. Put a jack stand under the truck for safety. Chock the wheels to keep the truck from moving because we will be shifting the transfer case into neutral so we can spin the hub. If you are working on the rear you can't apply the parking brakes.
 Pop the quick disconnect CTI air line from the opposite wheel you are working on to prevent the opposite tire from going flat while the truck is jacked up. This could cause an imbalance knocking the truck off of the jack.
 Using a 5/16" hex wrench drain the oil out of the hub and clean off the debris from the magnetic plug. Put a little liquid teflon pipe sealer and replace the plug. Tighten 8 to 13 ft lbs (96 to 150 in/lbs). I'm usually too lazy to use a torque wrench.
 Lately I've seen a lot of drain plugs that are so tight I had to use heat and force to loosen them. I found that 8 to 13 ft lbs is just barely snug. It is much lighter then I would have imagined.
I have a hex key that I made out of a larger size hex key. I ground down the 6 surfaces to a taper. I take a hammer and lightly drive my tapered hex into the plug. I put a pipe over the key to get more leverage and they usually come out.


Spindle Seal and Extension Removal
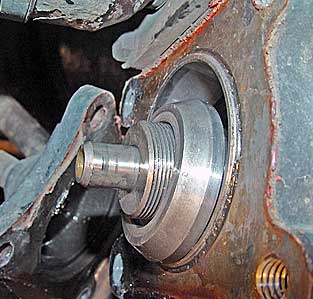
If you are replacing the spindle seal (small one) or the output seal unscrew the CTI line going into the steering arm cover using a 5/8" and 13/16" wrench. Unscrew the 4 - 3/4" bolts that hold on the steering arm cover and the CTIS shield. Note how the washers are installed on the shield. Pull the steering arm cover away from the hub to expose the spindle seal. Remove the snap ring with a pair of snap ring pliers. Take a flat bladed screwdriver and stick it in where the CTI line was attached. Using a small hammer tap out the small spindle seal. Don't scratch the seal surface.
If the spindle extension surface is damaged or not smooth it will not seal air. This part is press fit and glued into the spindle and is all but impossible to remove. If you don't have to replace it you are better off not touching it. A customer that owns a well equipped GM repair shop recently (2012) tried to replace this part and ended up ruining the spindle. He said that there was no way to get a punch into the hole.
If you have nothing to loose and want to try to replace it here's what you can try. One of my friends who has been a Hummer tech for years told me the easiest way is to use a slide hammer attachment small enough to go in the hole and expand. Otherwise use a long drift punch and a hammer to knock it out from the other direction. I've had a couple that come out easy and some that come out hard. If it gets the slightest bit crooked it will be hard.


Install the Output Seal
Using a 5/32" hex socket remove the clampnut lock screw. I used a hand impact tool for the job because the lock screw should be fastened with Locktite 272 red. I used my new clampnut socket with a 3/4" breaker bar to unscrew the clampnut which is also Locktited. Why all the Locktite on the clampnut? This is what holds the spindle and wheel on the truck and you don't ever want these parts to fall off. It is imperative for safety reasons to follow the directions given in the AMG manual exactly and to use the correct torques, sealers and lubricants.


Take the clampnut, keyed washer and the inner bearing and lay them out in order the way they came out on a clean surface. Once the clampnut is removed the whole spindle assembly (right) pulls out. The center photo shows the spindle extension which runs inside the spindle seal for the CTI. Make sure that the surface of the spindle extension is smooth or your CTI system will leak air. If it isn't clean it up or replace it.


Remove the output seal and clean the seal seat. I stick a long screwdriver in from the back of the hub and rest it against the inside of the seal. I then tap the seal loose with a hammer. Scrape all the old sealer from the hub and steering arm cover and clean it all off with a solvent like brake cleaner or carburetor cleaner. Inspect all the parts for roughness or corrosion and replace if necessary.
A contributor to seals being blown out is clogged vent lines. Since you are right there I'd remove the vent line and make sure that it's clear. The lines can get brittle and crack off pieces of rubber clogging the line. This will build up pressure which will blow out seals.


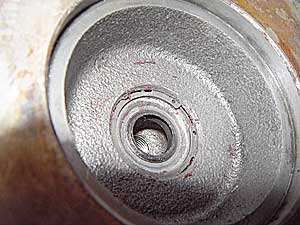
 The photo on the left shows the cleaned up output seal seat. Coat the new seal with some hub oil and gently tap it in with a rubber mallet. This seal gets driven in all the way to the bottom of the seat. If you have the AMG hub seal installer all the better. I use the old seal to drive the new one in place.
You can also use a flat piece of metal or wood across the diameter of the seal and strike it in the center. This way you can keep the seal even as you're driving it in.
Another tip is to put dabs of grease (once every 90Deg or so) over the spring prior to tapping the seal into place to prevent any possibility of the spring dislodging.
 This shows the seal properly installed . The bevel on the outside edge of the seat is exposed. Coat the seal with oil.
 The picture shows the surface of the spindle that contacts the output seal. Clean it up with some solvent and polish any roughness with some fine #400 sandpaper. If it's chewed up you have to replace the spindle. Coat the surface with hub oil.

Taking care that the bearings and spacers are in the correct order and direction insert the spindle into hub while aligning the splines on the inside of the hub gear. Push the hub all the way in and seat the sealing surface of the spindle into the plastic seal. Then put the spacer, bearing, washer and spindle nut back on the inside of the spindle in the order and direction shown in the top pictures.
 The next steps are Very Critical to ensuring that the spindle nut is installed in a way that ensures long bearing life and the safe securing of the spindle to the vehicle. You must use the correct Locktite and follow the torque specs very carefully. Because the clampnut and clampnut lock screw are secured with Locktite red 272 the whole operation must be completed within 10 minutes before the locktite dries.
The following proceedure is directly out of the 2003 AMG shop manual.
NOTE: After clampnut lock screw is installed into clampnut,
clampnut must be completely installed on spindle within a ten
minute limit.
1. Tighten clampnut lock screw three to five turns into
clampnut. CAUTION: Ensure clampnut is installed on spindle with boss
(protruding side) facing inward toward bearing and large
chamfer side with engraved part number facing away from
bearing. See the photo above in the disassembly section.
2. Apply a thin coat of grease to boss (protruding side) of
clampnut and install clampnut on spindle.
3. If an excessive amount of torque (18-26 lb-in. (2-3 N•m))
is required to tighten clampnut lock screw to remove
clampnut wobble, remove clampnut lock screw. Ensure
threads of clampnut are clean and free of Loctite. Replace
screw with a new one or remove all previously applied
Loctite from threads of old screw and apply fresh Loctite
272 to old screw threads prior to reinstallation. Use hex socket and torque wrench to tighten and check screw
torque.
4. Tighten clampnut lock screw until all clampnut wobble is
removed but clampnut can still be rotated by hand.
5. Using clampnut socket J–42545, tighten clampnut to 40
lb-ft (54 N•m). Put the transfercase in Neutral and Rotate spindle five
revolutions both clockwise and counterclockwise to seat
bearings. Losen the clampnut and keep pressure on the lug side of the spindle so it doesn't droop down when loosened. Repeat the above proceedure.
6. Put the transfercase back in H and Loosen and retighten clampnut to 25 lb-ft (34 N•m).
Rotate the spindle and check the torque again. NOTE: Ensure clampnut does not move while clampnut lock
screw is being tightened.
7. Tighten clamp nut lock screw to 90 lb-in. (10 N•m).
8. Mark a temporary line across end of spindle and clamp
nut. Then, using a feeler gauge, ensure a gap exists
between clampnut gap surfaces. If no gap exists, remove
and discard clampnut lock screw and clampnut. Acquire
new screw and nut and repeat steps.
9. Apply 90 lb-ft (122 N•m) of loosening torque to clampnut.
Clampnut should not move. To verify no movement
occurred, check temporary mark across spindle and
clampnut. If clampnut moved, remove and discard
clampnut lock screw and clampnut. Repeat above steps with
new screw and nut.
Installing the Spindle (CTI) seal:
 After cleaning off the spindle seal seat coat the outer metal part of the spindle seal with some sealer and place it squarely into the seat with the convex side toward you. Tap it all the way into the cover with a deep 7/8" socket. Don't try to seat it if it flips sideways or it will be damaged and leak. Don't forget to replace the snap ring. Make sure that the snap ring is in the groove. If you didn't seat the seal all the way the groove for the snap ring will not be exposed.

 Clean the sealing surfaces on geared hub and steering arm cover and lightly sand it with very fine emery. Apply Loctite 518 or Permatex 51813 (same thing) anaerobic sealant to steering arm cover. Coat the whole part around all 4 holes. (I didn't in the picture) Coat the spindle extension with hub oil and carefully push the cover onto the end of the spindle lining up the 4 bolt holes. If you are not careful you will damage the seal and cause a CTI air leak. Don't forget the washers and the CTIS shield. I use Locktite 242 blue on these bolts and torque them to 75 ft lbs.
Next use some liquid teflon sealer and screw the CTI line back into the steering arm cover.
Check the hub for air tightness by screwing a 1/4 npt plug into the outer hub you are working on and reconnecting the opposite CTI line to the system. This pressurizes the pair of hubs and allows you to check for air leaks.
 Refill the hub with your favorite oil. You can use the same oil you use in the differentials, GL-5, SAE 80w- 90 or 75w-90 gear lube. You don't need special hub oil. Fill the hub until the oil is just under the level of the fill plug. Each hub takes about a 1/2 quart. Tighten the fill plug 8 to 13 ft lbs (96 to 150 in/lbs). Don't crush the nylon washer. I'm usually too lazy to use a torque wrench on the fill and drain plugs. Lately I've seen a lot of drain plugs that are so tight I had to use heat and force to loosen them. I found that 8 to 13 ft lbs is just barely snug and much lighter then I would have imagined. I grease the tierod end since it's been moved around when the hub cover was off.
Clean the oil off the inside of the tire and wheel with some engine degreaser and reinstall. Drive the truck and check for leaks.

