
Changing Your 4L80e Transmission Filter & Transfer Case Oil
Updated April 19, 2016
 The 24,000 mile maintenance calls for a transmission filter change. I'm going to tell you up front that this is no small job especially if you are laying on your back without a lift. You have to remove the larger middle undercarriage protection piece, remove the center support beam for the transfer case, move the front drive shaft out of the way, try to drain the oil from the pan (if you have a drain plug), remove the oil pan and get a bath of oil all over the place. When I changed the trans filter I also changed the oil in the transfer case which means I had to remove the transfer case skid plate. It took me about 6 hours to do. With breaks and lunch it took up the whole day. A Hummer mechanic with a lift should be able to do it in 2.5 hours or less. One Hummer tech told me that you can do this without removing the drive shaft or the center support.
Hummers use 3 different filters depending on the year of the truck. In 1992 and 1993 Hummers and HMMWV's have a 3 speed TH400 automatic transmission. The AC filter number is TF249
In 1994 AMG began using the 4L80e 4 speed automatic. In 1994 thru 1996 the oil pans are shallow and don't have any drain plugs. the AC filter number is TF333 IF.
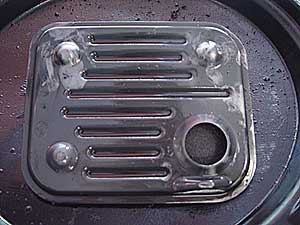
The filter that AMG sells for 1997 and up is a standard AC Delco IF329 for a 4L80e trans. In 1997 they went to a deeper transmission oil pan so make sure that the filter you have has the big 'dimples' (see photo below) which rest on the bottom. This is VERY important. If the filter falls off or isn't at the bottom of the pan it might not be able to pickup transmission fluid which will starve the transmission of oil causing damage.
At the 2002 Hummer Club event in Durango a few trucks blew their transmissions when they drove up a vertical wall at the "Jeep Eater" obstacle and stopped and waited at the top with their trucks almost vertical for pictures . You can see the fun in the photo section Durango pictures. I've done this (me on the left) many times without any damage to my transmission but I wouldn't press your luck.
Automatic Transmission Fluids
What fluid to use is getting more and more complicated. From Wikipedia. "Dexron is the trade name for a group of technical specifications of automatic transmission fluid created by General Motors (GM). The name is a registered trademark of GM, which licenses the name and specifications to external companies which manufacture the fluid and sell it under their own brands. GM has upgraded the Dexron specifications over the years; newer fluids are generally but not always backward compatible with previous Dexron fluids. The current fluid is Dexron-VI, introduced in 2005."
- Dexron: The original Dexron fluid, like its predecessor Type-A/Suffix-A, used sperm whale oil as a friction modifier. The U.S. Endangered Species Act banned the import of sperm whale oil, so Dexron fluid had to be reformulated.
- Dexron-II: Dexron-II was introduced in 1972 with alternative friction modifiers such as Jojoba oil. However, it made problems with corrosion-prone solder in GM's transmission fluid coolers and so had to be reformulated.
- Dexron-IID: Corrosion inhibitors were added to Dexron-II to address the solder corrosion issue. The resultant fluid, released in 1975, was called Dexron-IID. However, the corrosion inhibitor made the new fluid hygroscopic to a problematic degree, and so had to be reformulated.
- Dexron-IIE: Dexron-IIE was introduced in an effort to address the hygroscopicity problems with the previous IID fluid.
- Dexron-III: In 1993, GM released new Dexron-III fluid. It is generally backward-compatible with transmissions originally filled with earlier Dexron fluids or with Type-A/Suffix-A fluid.
- Dexron-VI: Just for GM Hydramatic transmissions, a few GM Allison transmissions, and no others. Do not use in your transfer case. The fluid specification for Dexron-VI was introduced in 2005,and was first used as the GM factory-fill automatic transmission fluid for model year 2006. All Dexron-III licenses expired permanently at the end of 2006, and GM now supports only Dexron-VI fluids for use in their automatic transmissions. Fluids asserted by their manufacturers to meet Dexron-III standards continue to be sold under abbreviated names such as Dex/Merc, but the licensing system no longer exists. These fluids are not regulated by GM. Dexron VI is of a slightly lighter viscosity than the prior Dexron fluids. The intent of this lighter viscosity is to gain an incremental improvement in fuel economy by lessening parasitic drag in the transmission.
According to GM When DEXRON-III is indicated as the fluid fill for manual transmissions and transfer cases, DO NOT use DEXRON-VI. Instead, use GM Manual Transmission Fluid p/n 88861800 in these components. The Hummer transfer case is a New Venture/ Chrysler NP-242. Chrysler says to use their ATF+4 fluid. My preference is synthetic Dexron III.
The hummer transmissions up to but not including 2006 run great with regular Dexron III.
- Set the parking brake and remove the undercarriage Protection.
- Remove the transfercase skid plate
- Place a jack under the transfer case for support and remove the center support crossmember and transfer case mount.
- If you can't move the shifter bracket out of the way you will have to drop the front drive shaft out of the way. Taking apart the Drive Shaft leaves room to move the shifter bracket out of the way. Put the parking brake on and the transfercase in Neutral (N). Jack up the front left wheel so it will rotate. Now you can turn the wheel and rotate the U Joint we have to take apart. Take a 3/8's wrench and undo the 2 pairs of nuts holding the U bolts around the bearing cups. Pull the U bolts out. Take a pry bar and lever the 2 halves of the U Joint apart being especially careful not to knock the bearing cups off the cross and spilling all the needle bearings. If you want you can take the bearing cups off and set them aside for safe keeping. Let the drive shaft down to rest on the exhaust pipe.
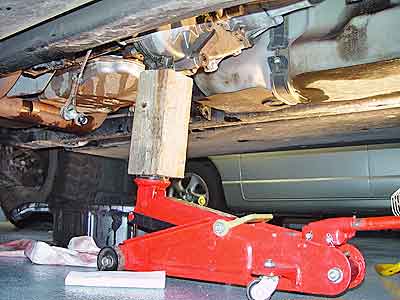 Transfer case Supported after Center Support Crossmember was Removed. I've been told that you should be able to get by with just removing the transfer case mount and not the whole center support.
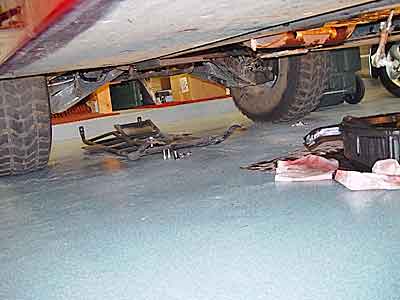
 5.) Drain the oil and remove the oil pan. This shows the Center Support crossmember, Transfer case Skid Plate and a big mess. I tried to drain the oil from the pan using the drain hole (some older trucks don't have one). The drain plug was frozen so rather then strip it I chose to drain the oil using the method for plugless pans. What you do is remove the pan screws at the rear of the truck. Then slowly unscrew the others which will in theory drop the rear of the pan draining the oil. What really happened is when I undid the screws the oil just spilled over the top of the pan and all over the place. Next time I'm going to get one of those big shallow sheet metal drip pans for the floor. The newspaper I used just got soaked.
 If you do have a drain plug it uses a Torx T-55 socket. DO NOT use a hex key. You will strip the top of the plug which will create a major problem. You will have to drill and extract the plug. Being able to drain the oil before you take the pan down will save a big time mess.
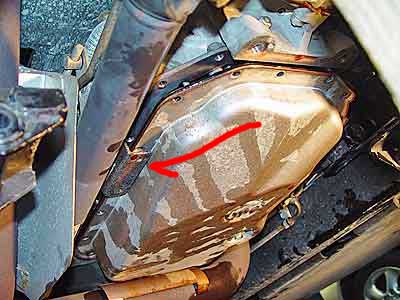
This is why you have to drop the drive shaft. The shifter bracket lies against the drive shaft interfering with removing the oil pan.
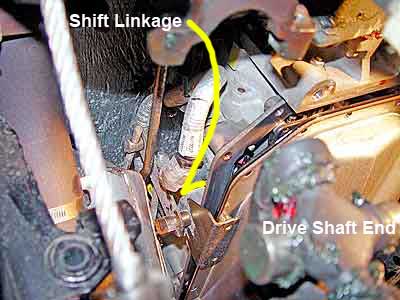

The Drive shaft dropped, the bracket moved out of the way and the oil pan removed. Clean up the shift linkage by soaking it with something like WD-40 and taking a rag and wiping the parts down. Then take some grease and spread it on the moving parts with your fingers. While you're at it you can also cleanup and lube the transfer case linkage. By the way, I use those blue rubber gloves when I work.
6.) Remove the old filter by pulling it straight down.
This is what a typical filter looks like. The lighter area in the top left corner is where I grabbed it pulling it off. The gray on the metal and the sponge inside is all dark from what the filter trapped.

Top and Bottom of a new transmission Filter for a 97 and newer truck. 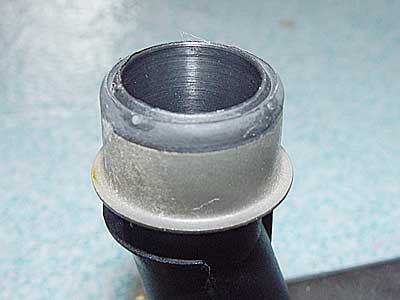
Mating Bushing on the filter where it inserts into the transmission
7.) Install the new filter.
In this install I removed the old filter bushing from the transmission just to see if it was the same as the new one. If you do this be very careful that you don't crack the aluminum surrounding the bushing. I found the new and old bushings to be the same so you don't have to remove the old bushing. The new filter will push up into the old bushing just fine. Make sure you coat the filter inlet with oil before you start to push it up. It will be tight so rotate the filter as you push

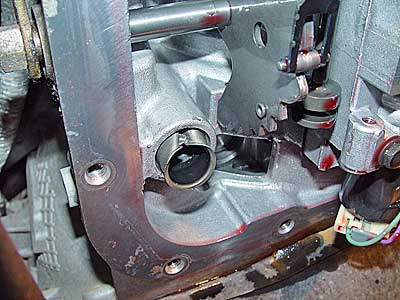
Filter inserted into the transmission

Inside of the oil pan showing a gray scum before it was cleaned up. This is a reusable gasket. It's pretty substantial with the metal lined holes

Magnet in the oil pan showing the fine metal it picked up in 24,000 miles. This is pretty typical of all the trucks I've seen.
8.) Clean the oil pan, the gasket, and the mating surfaces very well. You don't want any particles of dirt getting into the very tight toleranced transmission.
9.) Put the gasket on the pan and push both up into the transmission. Start two of the bolts (one in front and one in the rear) to hold the pan up in place. Make sure that you start all of these bolts by hand. You do not want to strip any of the threads in the aluminum transmission. Start the 4 bolts that face the front of the truck first because these are the hardest to get to. Then start the all the others. Push the linkage up when you position the shifter bracket and start the 2 bolts. If the linkage isn't in the right spot it won't work and the drive shaft will not have enough clearance to be reattached. Use a 10mm socket (the shifter bracket is 1/2") and snug up all the bolts starting in the middle and going from side to side. Using the same pattern torque these bolts to 12 ft/lbs. This is snug but not cranked down. You do not want to crush the gasket, it will cause leaks.
10.) Test the shifter to make sure it works. Don't start the engine.
11.) Put the drive shaft back together and grease it. You can lower the front tire and shift the transfer case back to 2H.
12.) Put the center support crossmember back on and remove the jack.
Remove the dipstick and clean off the entire length with a rag and oil. My dipstick was filthy. You don't want dirt contaminating the transmission. While the transmission, cooler and torque converter use 13.5 qt's of oil you will only be able to change out around 5 because you can't drain the torque converter.
Check The Fluid Level
Pour 4 quarts of Dexron III into the transmission through the dipstick hole near the firewall under the hood. Check the dipstick and add fluid until there is enough to show on the dipstick. After you pour fluid down the tube wait a bit to check it because the dipstick will get wet with oil that is clinging to the side of the tube. Start up the truck and look underneath for oil leaks. Let the truck warm up. Shift the transmission from drive to reverse a few times. With the engine still running check the dipstick and fill it up if necessary. Take it for a ride which will work the oil into the transmission and really warm it up right. With the transmission in park, the engine warm and still running recheck the fluid level and fill if necessary.
In about 1996, the style of the pan on the transmission was changed
from flat-bottom to faceted-bottom. With this change, the amount of
ATF required was reduced from about 5.5 qt. to about 4 qt. for a
normal fluid drain & fill.
In both the engine and the transmission, the fluid volume varies by a
little bit because of drain-back from the coolers. The more drain-
back, the more fluid it takes to refill.
Obviously this will only change out 4 or 5 of the 13.5 qts. You can service your transmission by doing 3 complete drain/fill procedures and driving 300 miles after each drain fill. Otherwise you can get all the fluid transfused.
Apparently, every 4L80E transmission leaves the factory with a bottle of Lubeguard Red ATF Protectant installed. I just did a tranny service and added 8 ounces (1 ounce per quart of transmission fluid capacity) and it does shift much smoother...I do not have any transmission problems to speak of, but this product sure does seem to work.
NAPA sells the Lubegard ATF Protectant. It is in a red, ribbed bottle and costs around 13.00 a bottle.
Don't be surprised if you smell burning oil because you probably spilled transmission oil on the hot exhaust pipes.
Changing the Transfercase Oil
Next I changed the oil in the transfer case. The fill and drain plugs on my 98 and the 2000 use a 10mm hex key. I've found that these plugs are usually very tight. Don't use a key that's too small or you will strip it. I use a key and a piece of pipe over the end to break the plugs loose. Remove the top plug first too see if the case is over or under filled. If it's over filled by a lot the case may have a broken cooler loop otherwise known as the vampire. Then I open the bottom and drain the fluid.
Hummer transfer cases run very hot and burn fluid. If the fluid is burnt and brown you have been driving too fast. Drive around 65 mph and you won't have a problem. I always replace the transfer case fluid with Synthetic Dexron because it takes a lot more heat before it breaks down. Replace the bottom drain plug. Use teflon pipe sealer. Tighten the plug with the wrench by hand. Do not over tighten the plug. Fill the case so the level is just below the top filler hole and replace the filler plug. Install the transfer case skid plate. The t-case takes around 2.5 quarts
