
Turbo Boost Fooler
by Steve Yee
Updated October 10, 2007
This is applicable only to 1996 to 2003 trucks with the standard 6.5L TD engine. This is not applicable to the 2004 models due to it's emissions package.
WARNING - DO NOT PERFORM THIS UNLESS YOU HAVE THE FOLLOWING: - EGT Gauge - Boost Gauge (See Chuck's article on the Westach install) - Intake Air Temp gauge (Scangauge or Interceptor OBD-II gauge) You will bork your engine if you aren't careful. Enough said.
How it works:
There is a boost pressure sensor on the passenger side intake cover. This boost pressure sensor has a GM 3 prong weatherpack connector that goes to the PCM. Pin B (center wire) reads voltage levels generated from the boost pressure sensor. Based on stock PCM programming, boost from the turbo will peak at about 10psi, then drop and raise up and down as the PCM sees fit by messing with the wastegate controller's vacuum levels. Because of the strange programming (plus lack of gauges), the PCM is programmed on the ultra conservative side. You'll likely never get more than a constant 2-3 psi of boost at the most, dropping down to nearly no boost at cruising speeds with little throttle input.
What the boost fooler will do is change the resistance of the center wire causing the voltage that the PCM reads to be lower then normal. This in turn will cause the PCM to increase boost.
With that being said - you will see:
- Lower EGT's
- Higher IAT's
- Highly reduced or mild increase in MPG's, depending on how aggressive your lead foot is.
There are two variants of the Boost Fooler - both require similar parts. Up next - building the simpler boost fooler.
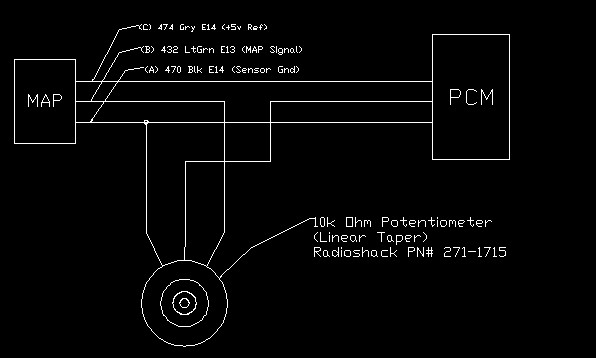 This is the drawing that everything is based upon. The potentiometer shown can be found at Radio Shack - under 4 bucks. Or - you can just place a 10k, 1/2 watt resistor (5% tolerance) inline with the B wire and ignore the linear pot.
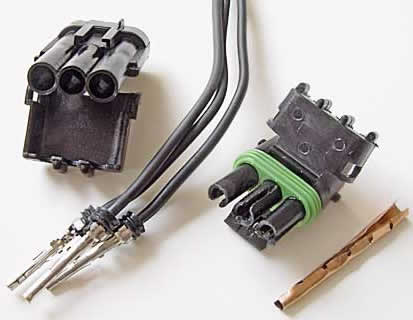
Okay...building one, you need these parts. Depending on what you are building you may not need the 10k resistors.
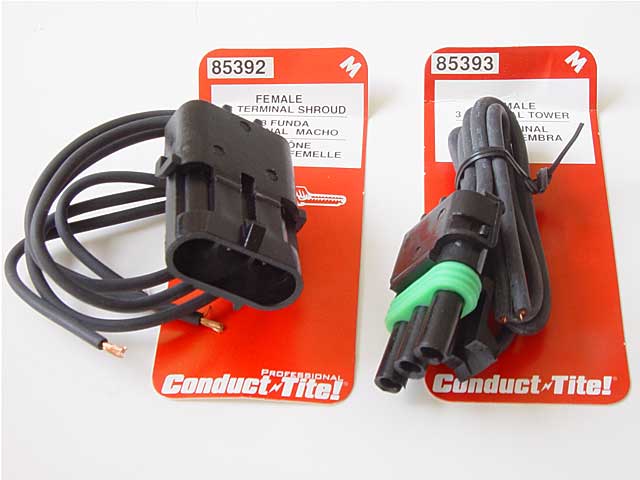
- Weatherpack connector - Conduct-Tite 85393 - Male 3 terminal shroud - $7.50
- Weatherpack connector - Conduct-Tite 85392 - Female 3 terminal tower - $7.50
- Weatherpack pin removal tool (important)
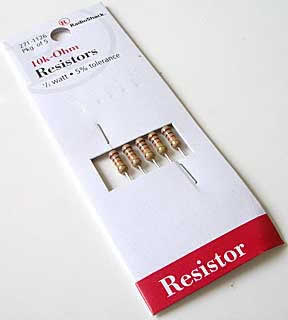
- Radio Shack 10K ohm, 1/2 Watt resistor. 5 pack - $0.99
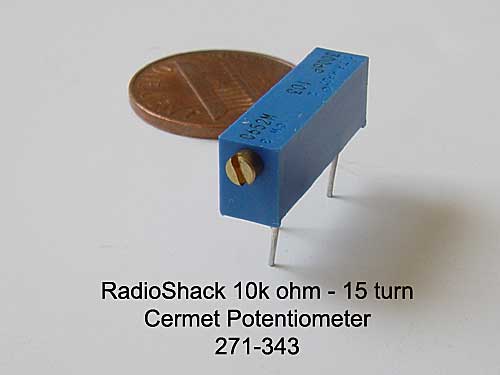
- Radio Shack 10k ohm - 15 turn - .75 watt Potentiometer - $2.60
- Various Posi-Lock crimp connectors (not needed if you are going to solder and use shrink tubing)
- OBD II scan tool to reset error codes (optional)
Note: you can get a Radio shack 10k linear volume control pot 271-1715
Tools needed:
- Weatherpack insertion/removal tool (may not need)
- Dremel tool with a cutoff disc or a Lineman's scissors
- Screwdrivers
First - Remove all the pins from the weatherpack connectors. I didn't have the removal tool so in desperation I made a tool by wrapping some thin copper sheet around a drill bit the diameter of the base of the pins. To match the connectors on the truck, the male connector needs the male pins, and the female connectors need female pins.
Some weatherpack connectors are marked as to which pins are A, B, and C on the housing.
My female connector didn't have any internal keying but some do. If you do; take the pins out of the female housing and ream out all pieces of plastic that key the connector.
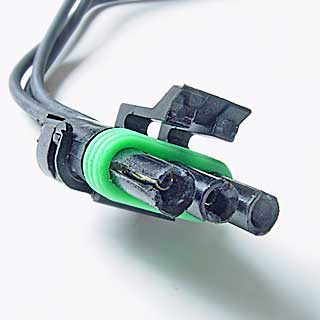
The housing on the boost sensor is keyed on the truck, and will NOT match up with the housing on the Conduct-Tite third party weatherpacks. It will be necessary to cut new slots in the male plug to match the sensor socket. Pins A and B are keyed.
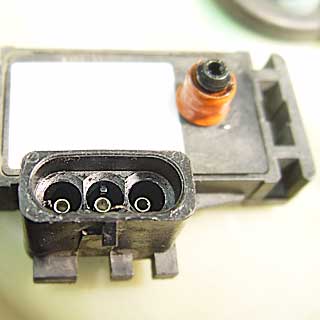
Shown above is the bottom of the boost sensor with it's keyed socket and the keyed plug that mates with it.
Make sure that the metal pins of the connectors do not get pushed back or they won't make contact when plugged in.
Then, take the male housing, and key A to the 9 o'clock position, and B to the 6 o'clock position as shown above. I used a dremel with a cutoff disc; some have used a lineman's scissors (heavy duty scissor). I was able to cut the notches without removing the pins.
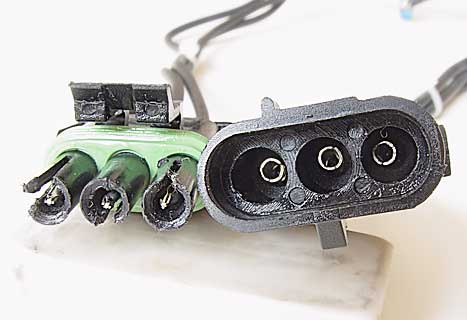 Reinsert all male pins into the male housing, and all female pins into the female housing. The picture on the left is how the connectors should look.
From there, take a Posi-Lock connector (crimp connector), and hook up the A's together. Do the same for the C's. I soldered the ends and used heat shrink tubing.
With B, take one 10k Ohm resistor, and trim off all excess leads save for about 1/2 inch on each side. Place one end inside a Posi-Lock connector, ensuring that the lock shroud covers about 1/2 of the resistor, and then fasten the connector into the housing of a Posi-Lock. Repeat on the other side of the resistor. Then link the unattached ends of the paired Posi-Locks to the B wires on both Weatherpacks. That's it. The harness is done.
To build the linear potentiometer version - follow the same steps. However, you follow the diagram shown. The diagram has the proper part number from Radio Shack. Be aware that with the pic - the MAP side is the male pin/male connector side. The PCM side is the female pin/female connector combination. You need to be aware of this in order to prevent miswiring the fooler.
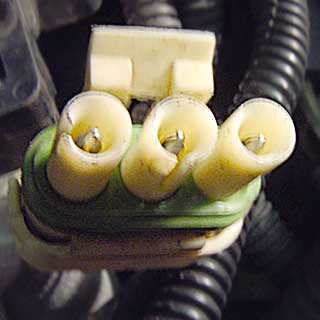
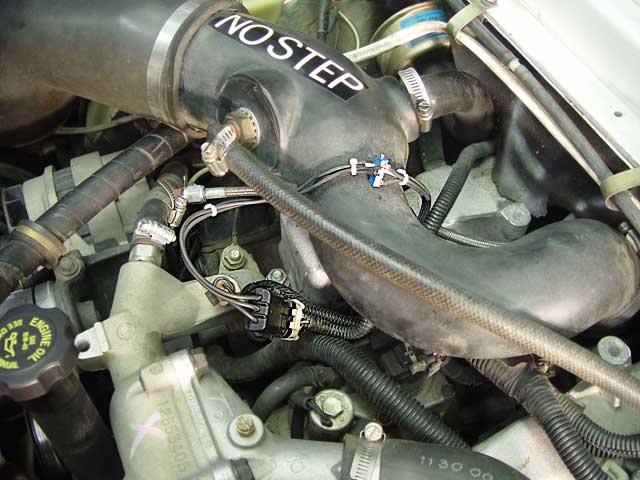
To install - The shots below show what area we are dealing with. What we want to do is insert our new assembly in between the boost pressure sensor and the truck's harness. The small black box under the intake tube is the boost pressure sensor. On the driver's side of that box is the weatherpack connector which is facing down. Take a screwdriver, unlock the connector (gently lift the tab up) and push the plug down to remove it. Take the female end of the boost fooler harness and insert it into the male plug you just removed from the sensor. Then, take the male plug end of the boost fooler harness, and insert it up into the boost pressure sensor. I had problems with the plug locking in. I actually removed the sensor for a closer look. The plug on my fooler was not an exact fit for the sensor socket. I was able to push it on but it didn't lock correctly. It was pushed in enough but the plastic locking tab didn't want to spring down and lock on the sensor. I ended up using a wire tie to ensure it didn't come loose.
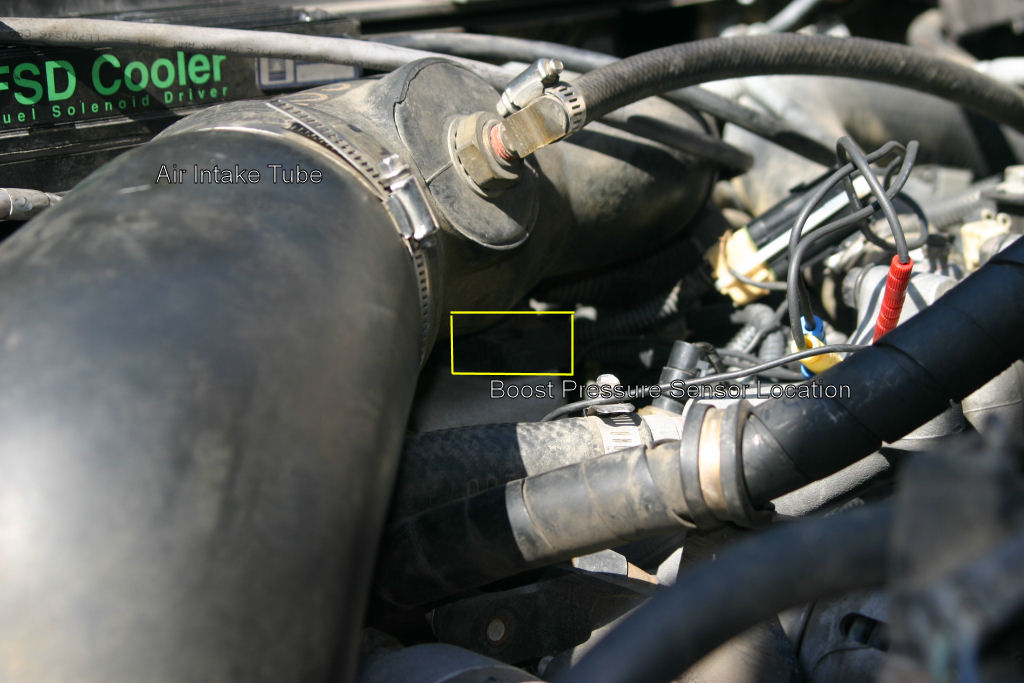
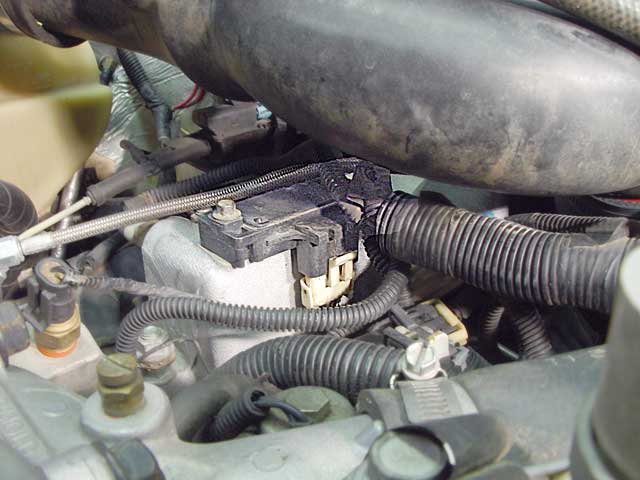
This shows the boost pressure sensor with the stock connector installed. The air intake was detached from the air cleaner and pushed to the side.
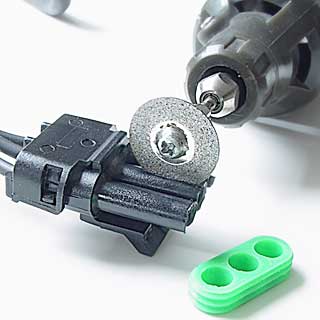
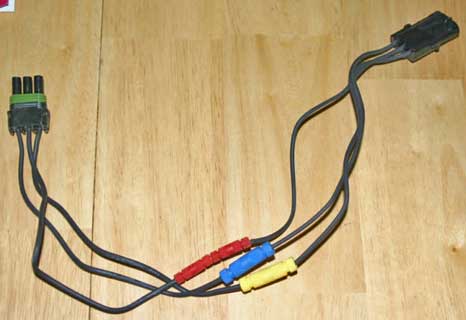
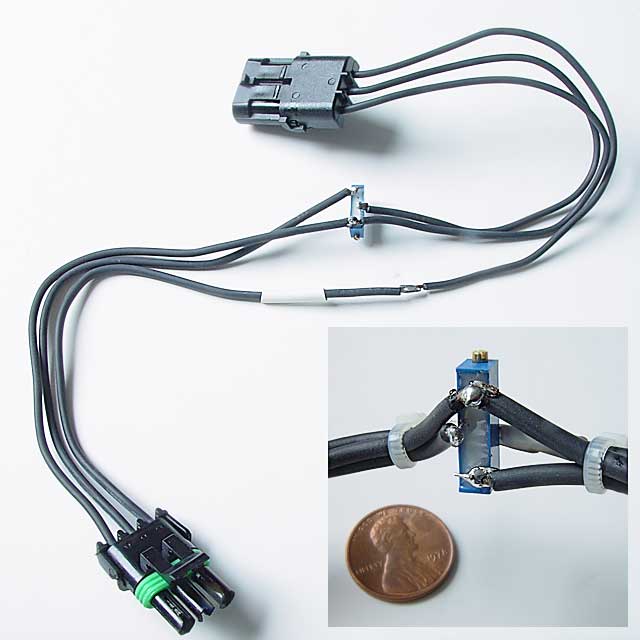
It's really recommended that you build up the linear pot version below. This gives you far greater control. The cable shown uses a single 10k trimmer pot which sits nicely on top of the air intake. Once this is out of the experimental stage I'll simply pour epoxy around the pot to encapsulate it.
To tune and test: (see final calibration instructions below) Turn the truck on. If your truck throws a code P0237, shut the truck off. If you're running the inline resistor version and you get a code P0237, you need to build up a linear pot variant.
Calibration Instructions
Alright - here's the *final* set of calibration instructions.
This assumes you have installed a boost gauge and an EGT gauge. If not - you're totally on your own. It also assumes you've done the linear pot method of the boost fooler, and you've already installed it.
Starting off - Place the potentiometer in the middle of the range. Start the engine - Check to see If you get a Malfunction Indicator Lamp (MIL) also known as a check engine light. If not you should be able to rev the engine to 1800 rpm and detect a little boost. Shut off the engine and turn the pot 1/8 turn clockwise (more resistance). If you are using a trimmer pot turn the pot clockwise one whole turn. Repeat.
Repeat until you get a Malfunction Indicator Lamp (MIL) also known as a check engine light. Revving the engine will not give you any boost. Use a scan tool to see if you've thrown a P0237 error code. Clear the code, shut off the engine, and turn the potentiometer counterclockwise 1/8th turn back. If you are using a trimmer pot turn the pot counterclockwise one whole turn back. Turn on the engine. You should not be throwing a P0237.
If you do not have a scan tool just assume that the MIL code is a P0237. Since you won't be able to reset the error use the presence or lack of boost as your indicator. The truck will throw an error when it reads a value that is out of range. Once the value is correct the truck will operate correctly but the code and the light will remain on until it's reset. Once the error condition is gone the code will clear in about 5 starts of the truck.
Now -take the truck for a test drive. At 15mph, you should see boost. If you see no boost and the truck is sluggish, shut down the truck, turn back the pot 1/8 turn counterclockwise (less resistance) and restart the truck. Drive again. If you still see no boost at 15mph, repeat the process until you do.
At this point - you have tuned the potentiometer in a overall (gross) setting. Now it's time for the fine tuning.
To fine tune - drive from 0 to 45. You should get no more than 14psi boost on acceleration and should be seeing it peak at 12. At 35, you should see about 5psi boost.
Now - do a freeway drive to 65. You should get no more than 14psi boost on acceleration.
If you do get more than 14psi, throttle back, pull over, shut the engine down, and reduce the potentiometer a smidgeon counterclockwise (less than 1/8th of a turn CCW). Repeat the process.
You are looking for:
- 10-11psi boost at hard acceleration
- 5-7psi boost at 3-4 shift
- 2-4psi boost at TC lockup
- 1-2psi boost at cruise
Now, the next posts deal with what I've gotten as results, one with an inline 10k resistor, the others with a dual boost fooler (10k inline plus a 10k linear pot). This means I wired a 10k resistor in series with the center wire anywhere. This will give me resistance values between 10k and 20k.
In city driving results:
Hard Driving
- IAT - 210*F (WARNING!!!!)
- EGT - 700*F (nice!!)
- MPG - 6.5MPG (major suckage on this one. This is from a calibrated ScanGauge)
Moderate driving, city streets, same speed, same miles. No hitting the accelerator hard (1/2 down). Ambient air temp - about the same: 106*F. 1 Hour difference in timeframe (swim lessons for my kid....)
- IAT - 190*F (somewhat better)
- EGT - 700*F (same - which shows the boost works to keep things down EGT wise)
- MPG - 10.5 (Better. About what I get normally)
Boost results - freeway driving, inline 10k resistor only.
Acceleration (moderate) - Boost peaks at 11 until 1/2 shift, drops down to 5 during 2/3 shift, peaks back up to 8, goes back down to 5 during 3/4 shift. When lockup occurs, boost drops down to 2-3 (!!!).
Acceleration (very hard) - Boost peaks at 13 until 1/2 shift, drops down to 8 during 2/3 shift, peaks to 10, goes back down to 5 during 3/4 shift. TC lockup - boost dumps down to 2-3.
Freeway speeds - Boost stays at around 4 PSI. When speeds get above
Dual Boost fooler results and commentary.
Config - dual Boost Foolers. One with a 10k fixed resistor, the other with a 10k linear pot, daisy chained together.
Pot setting 1/5th of a turn from zero resistance. Estimated total resistance - 11k ohms.
All street test runs performed were 5 mile runs, with fill ups between each 5 mile run (to ensure that I started/ended with a known fuel usage). All freeway runs were the same 8 mile run that were done prior to match similar results, with fill ups again between each run. And yes, the gas station thought I was absolutely insane.
Seat of the pants observation - There is definitely more torque. Turbo lag is now noticeable now - take off normally, then boost starts hitting, then you get a surge when the boost hits around 10psi or higher. ---
Results
Street driving - lead footed/hammer acceleration:
Boost kicks up to 14psi (1-2)10psi (2-3), 8psi (3-4) 4-5psi (Locked TC, 45mph). EGT's - never hit above 1000*F. IAT's - 210's. MPG - 7mpg.
Street driving - moderate/cautious: Boost kicks up to 12psi (1-2), 8psi (2-3) 5psi (3-4), 4-5psi (Locked TC, 45mph). EGT's - never hit above 850*F, IAT's - 200's, MPG - 9mpg.
Freeway driving - lead footed/hammer acceleration. Boost kicks up to 14psi (1-2), 12psi (2-3), 10psi (3-4), 8psi (TC lock to 50), 5psi (55-65mph, TC locked). IAT's to 220-230
Freeway Passing/hammered accelerator - 50 to 65mph: Boost to 14psi, downshift 4-3, EGT to 1000*F, IAT's to 230*F, defuel at 235*F IAT indicated.
Overall MPG's while lead footed - 10.3mpg
Freeway driving - moderate/cautions. Boost to 14psi (1-2), 12psi (2-3), 8psi (TC Lock to 50), 4-5psi (55-65mph, TC locked).
Freeway passing / cautious acceleration - 50-65mph: Boost to 12psi, no downshift, EGT to 900*F, IAT's to 220*F, no defuel.
Overall MPG's while moderate - 15.5mpg (!!!!!....not bad running 38's, trail load, with A/C on...) ---
Observations ---
1) Forget about doing a snap/idle test for emissions with this on. If you're parked, and hit the accelerator, you get no higher than 2200rpm while sitting still. Why? I don't know.
2) As mentioned - the seat of the pants feel is really nice. It's like driving a totally different truck.
3) Dual 10k Linear pots is best. (You'll see why in another bullet point). This allows you to tune from mild to wild, and if you tune it right, you'll see how much fun you can really have with this engine.
4) It seems that the Hummer ECU/PCM tuning is totally different from year to year. I'm gonna call Westers tomorrow. It also seems different from standard GM to Hummers as well. Dual 10k resistors have seemed to not work well at all in standard GM configs, where in this case, it works fine. So by doing dual 10k linear pots, you're able to tune it exactly to where your particular's engine's sweet spot is.
With regards to #4, I can't really prove it totally until I get another guinea pig with a 1997 or 1998 truck (whose programming are nearly identical).
5) I know that when summer goes into fall and then winter, I will have to retune it. Air density will have a play with everything.
6) This is definitely cool. I've got nearly the exact ability of a PCM/ECU reflash without the cost and it's totally reversible (!!!)
7) This mod is a great excuse for a huge wrenching party.
Cool Unlike the single 10k inline resistor, the dual resistor setup enables me to prevent the boost from bouncing up and down. Very, very nice....
I will be doing a trip to Anthem tomorrow (a good freeway test), and I'll also be doing some towing on Saturday. We'll see how well towing goes.
Don't get too aggressive. I had 15psi boost hit once - the truck defueled itself. Scared the crap out of me.
Total cost for this mini project - 26 bucks for the connectors, 10 bucks for the posi-locks, $.99 for the inline resistors, and 3.29 for the linear potentiometer. Call it 45 bucks after tax. Very nice results from it. It's a worthwhile setup.
Okay - this experiment is done on a 1997.5 truck. I used a linear pot set at 6k ohms. It's a success. Using both paper calculations, plus my calibrated scangauge, here's the results from a workplace location to Anthem (another location where my work has an office), and back to the original workplace location. I made another set of harness extensions for both the MAP side and the PCM side - so I can add/move/change boost foolers at will. Total mixed MPG (start/street to freeway to street/destination/street to freeway to street/end)- 13.8. Sweet! Our engines can actually perform where they should be. Freeway - 16.7 MPG. This is at 60mph, ~2350rpm's, IAT's at barely under 230, EGT's under 900, and boost at a constant 7psi (cool!!!). Turbo lag - icky. Lag occurs when you start until you reach 10mph, and boost gets above 8PSI. Then you get a surge. Seat of the pants torque - rolling start: You get some mild head snap. Very nice.
For moderate tuning, here are the results you should see...
- Freeway/hard street acceleration from a rolling start - 12psi
- Freeway in 3-4 shift, no TC lockup - 6 to 8psi
- Freeway in 4th gear, TC lockup - 3-4psi
- Street up to 45mph, 4th gear - 3psi
You will see with the moderate tuning that the boost will drop down sometimes to zero boost. This is normal - you can't overcome the PCM/ECU's conservative tuning.
Aggressive tuning
- Freeway/hard street acceleration from a rolling start - 14psi
- Freeway in 3-4 shift, no TC lockup - 10psi
- Freeway in 4th gear, TC lockup - 6-8 psi at max, 4-5 normal
- Street up to 45mph, 4th gear - 4 to 5psi normal
With the aggressive tuning - you will find that the PCM/ECU's attempts to reduce boost is somewhat overcome - you will see that boost is present even when you're coasting and you have light pressure on the accelerator.
MPG - I'm getting mixed results of about 13mpg (freeway/street). This is on the aggressive setting.
Throttle input - your accelerator/throttle inputs will be different. If you floor it - you bog. If you push about 1/2 down, you will get turbo lag until 10-15mph and boost goes above 8psi. Then you will get a turbo rush and some severe (for a Hummer) acceleration. So be warned - the throttle becomes really twitchy.
Freeway - you will find out that you have some reserve power and torque. This means that you're generally about 1/4 to 1/3rd of the way down pedal wise. Going to 1/2 down means you dump from 4th gear to 3rd, your RPMS jump, and your boost will peg. Be careful NOT to peg it beyond 14psi. When the boost gauge wavers, the peak boost is what you worry about - so if it peaks at 14psi, you need to pull back a bit on the throttle.
EGT's - you will find that your truck will run cooler. It's a very nice side effect - I haven't hit beyond 1100*F since starting this experiment. Average EGT's will be 400-700 in street mode, and under 1000 in most freeway modes.
Other notes:
If your engine hasn't had a recent seal job (meaning - every gasket and seal hasn't been replaced in the last two years), you need to do the moderate program. Sorry - that's protection for you and your engine.
You will need to relearn your driving patterns.
You should see about a 10% increase in overall MPG. If you do - this boost fooler is a success. The whole purpose of the boost fooler is to increase MPG's and increase boost for more power. There will be times where more power equals horrible fuel economy, so drive based on smooth acceleration and working within the torque and horsepower curves. The EGT and boost gauges help show that. And yes - 1 MPG increase on our trucks is a huge increase....at least for me.
A few other Comments...
Credit for the idea goes to DieselPlace.com and seeing Kennedy Diesel's version of the same thing. This item is free for anyone to build up. Just be careful. Any engines with crappy vacuum setups and possible gasket leakage and unreinforced bottom ends might have problems if you push your boost too much. Chuck - you're free to post this to the tech area. I have no problems with that and you can publish all photos, commentary, and results. Parts are available at any Pep Boys (or places that sell Connect Tite), and any Radio Shack. Soldering skills are needed to do the linear pot version of the boost fooler.
Conclusion
Well, the boost fooler seems to be somewhat of a permanent config on my truck...until I decide to go the route of a Turbomaster/Mechanical Wastegate controller. When I do that, I'll likely do the chemical intercooling route too.
Some additional pros/cons...
The primary pro (which can be a con) - the additional power is quite addictive. So - my fuel economy has not necessarily tanked, but it hasn't been stellar - I'm getting 11mpg right now, but I'm keeping pace with unmodded Duramaxes, Power Strokes, and Cummins. I'm sure that when the need for A/C goes down, fuel mileage will go up. Let's
just say that my right foot is very happy.
The two main cons:
- The stupid PCM does strange things. I'll be coasting along on the freeway at 63mph, when I see the boost go from a nice steady 7psi down to 2, then back to 7, then to 2, then it stabilizes at 4, then increases back to 7, then repeats the whole process. This is the PCM doing it's stupid thing. A Mechanical Wastegate controller would solve that issue.
- Head gasket issues - well, the increase in IAT's (input air temp) and pressure (to 12-13 psi max) can play havoc with the head gaskets. I'm glad I have Cometics right now. However, I can see how this would cause problems for those with marginal head gaskets.
So - intercooling is definitely the way to go here, chemical or air. It's something that has to be done if you're doing a boost increase long term.
Either way - it's a great addition. Just make sure that if you push the envelope to 12-13 psi, your engine is nice and buttoned up tight before doing it.
I've put back the stock paper based air filter in the truck. I'll see how well things go with it on a mid term basis.
