
How to Swap a Hummer Turbo Diesel Engine
Updated April 14, 2009
Click here to view about 75 photos of the whole process.
Rick and Chuck at Great Lakes Hummer in Niles Michigan performed the operation on my 98 turbo diesel with a cracked #8 cylinder on Jan 17, 2001. By the time they did my engine they had already performed many engine swaps. The pictures show what a complete engine looks like new in the crate. I had a rare opportunity to photograph many parts of the truck that are usually hidden from view, so if you are looking to see how something goes together or what a part looks like you might see it here.
When we did the swap the new water pump didn't bolt up to the old fan clutch. The new pump uses a big nut while the old one uses 4 bolts. I didn't want to put the old water pump on a brand new engine so I bought a new fan clutch to match the new water pump. My existing plastic fan bolted right to the new fan clutch.

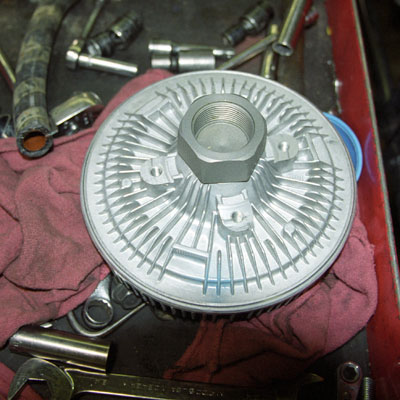
New Fan Clutch
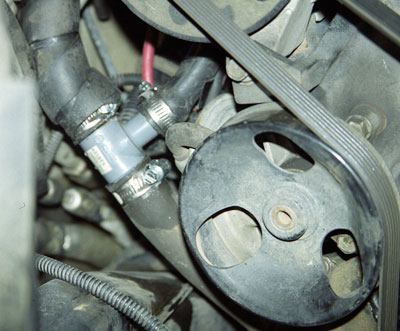 The new water pump had one outlet instead of 2 so we Tee'd the heater lines together as shown,
You will also see us installing a pyrometer in the turbine inlet tube to measure the EGT (exhaust gas temps). In addition we tapped the manifold and installed a brass fitting for the boost gauge.
Below is the list of exactly how you remove and replace an engine. The job takes between 18 and 24 man hours.
- Undo any connections to accessories fastened to the hood such as lights and winch controls.
- Remove the inside hood prop rod
- Remove hood hinges
- Remove the hood and set aside
- Remove the batteries
- Purge the A/C system
- Drain the antifreeze
- Remove the passenger side kick panel
- Remove the doghouse and set aside
- Remove the inside engine cover and set aside
- Disconnect the transmission cooler and oil cooler lines
- Disconnect the A/C lines
- Disconnect the heater and radiator hoses
- Unbolt and remove the radiator stack (there are bracket bolts on the inside of the stack to remove) and put aside.
- Remove the inner fender wells
- Remove the air inlet hose (big black one)
- Remove the serpentine belt and tensioner
- Remove the alternator
- Remove the fan/clutch
- Remove the Power steering pulley
- Remove lower pulley on balancer to allow more room to remove
- Remove the rear heat shields from engine
- Remove the turbo and inlet plenum
- Remove the wires from the glow plug controller
- Remove the nut holding the dipstick tube on top and the other on the turbo outlet. You will have to swap dipstick tubes because the 2000 dipstick is different.
- Remove the Alternator / Vacuum pump bracket
- Undo the wiring harness
- Raise the truck and remove the undercarriage protection
- Remove the heat shield and exhaust pipe cross over
- Unbolt the Center bearing and move drive shaft out of the way
- Drain the oil and remove the oil filter adapter
- Remove wire harness from block heater
- Unwire and remove the starter (keep track of the shim)
- Remove the triangular bracket that holds the starter wires from the oil pan
- Remove oil cooler lines and fittings from block and transfer to new block. You will have to loosen the exhaust manifold on the new engine to install the fitting
- Remove the motor mount bolts
- Remove the transmission inspection cover (torque converter)
- Remove torque converter bolts "6"
- Remove the bell housing bolts (depending on the engine new bolts may be metric)
- Change oil filter adapter from old block to new and install all new o-rings and seals
- Lower the truck and support the transmission with a floor jack
- Bolt on the engine puller frame
- PULL THE ENGINE OUT
- Exchange the CDR hose, motor mounts, engine harness and oil sender with new engine
- Move the radiator "U" bracket from the old engine to the new.
- Remove the turbo from the new engine
- Remove the fuel rails from the new engine. 98's don't use the new style rails.
- Remove the crankshaft pulley from the new engine. This allows the engine to be installed easier.
- You may have to swap the water pumps because of the fan clutch and heater outlet configuration.
- INSTALL NEW ENGINE making sure to line up the dowels on the trans and the motor mounts.
- Raise the truck and assemble the bottom end. Bell housing, center bearing, starter, exhaust crossover, filter adapter, oil cooler lines, shields and undercarriage protection etc.
- Use special silicon sealer to waterproof the starter connections
- Install the turbo from inside the truck.
- Attach all harnesses to the engine. It may be necessary to splice the engine harness on older trucks (prior to 98).
- Install the heat shields and turbo inlet tubes making sure to torque correctly. Over tightening the stainless inlet tubes will crimp them.
- Install the crankshaft pulley fan/ fan clutch
- Install the power steering pump, hoses, alternator and all engine brackets with serpentine belt.
- Install the cooling stack and reattach all hoses
- Install the wheel wells, battery tray and batteries.
- Refill with 3 gallons of antifreeze and water.
- Charge the A/C system
- Test start and check the injector pump timing with scan tool. Bleed air from cooling system and check out all functions.
- Grind taper on hood hinge bolts and install the hood. You may have to align the hood by loosening the mounting brackets.
