
Doing the Lift
Page © Copyright 2004 Edited by Chuck Kopelson 11/01/2004
Updated July 18, 2008
 Although I have free access to a lift, this is probably easiest to do in the middle bay of a 3-car garage. A good compressor and an impact wrench are suggested. Don't try this project without air tools. Wear coveralls if you have them, this is a dirty job. Power wash the undercarriage in advance and use goggles. Run the fuel tank to near empty.
I have a D-Ring brush guard, so that took some time to remove.
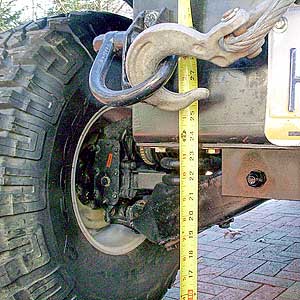
The body lift added about 2" while the MT/R 40's added an additional 1.5 inches of ground clarence for a total of 3.5". Looking at side of the vehicle, the body is 21.5" off the ground measured between the doors.
I decided to add 2 additional projects to the body lift. I reworked the front winch mounting and lifted the rear bumper. The winch went to 23.5” off the ground and the bumper is now 28” off the ground.
Overview:
 You will need to drop the gas tank. The gas tank hangs from brackets attached to the body. The gas tank will need to be lowered as the drive shaft goes along a cutout in the side of the tank. Lengthening the brackets will lower the tank. Lengthen the straps 2” or 3” depending on the height of the lift blocks. You will need to create a thick spacer block that goes above the tank so that the tank is held firmly in place.
Both vehicles are similar, but there are differences.
You will install 6 lift blocks; 2 in the rear by the bumper, 2 in the rear wheel well, and 2 up front. The rear blocks are easy to install. The front one near the oil filter (remove prior to installation) is a bit difficult to install. While the 7” bolt will drop in from above, you may need to drill out the lift block’s center hole to finesse the bolt into place. Air tools won't fit either. The other front block is hidden behind the heater core hoses. It goes in from the top and is easier to install than the driver side block. It’s also easier on a 6.2 than a 6.5TD.
If you use blocks made out of metal/ aluminum use Mylar film and/or body mount gaskets between those added "alu. blocks" and the OE steel body mount cushions sleeves to prevent galvanic corrosion.
The front of the hood needs to be lifted at the hinges so it's the same level as the top center hood latch which is now 2" taller due to the lift. I will keep an eye out for a block of material similar to that of the lift blocks, but in the interim, I used a 4x4x2" block of synthetic wood which is impervious to weather and doesn't compress. Since the airlift hooks are bolted to the frame they don't get lifted with the body. This means that they will not be sticking out the top of the hood anymore. This isn't an issue unless you have a 'D' ring brush guard or want the 'look' of the hooks.
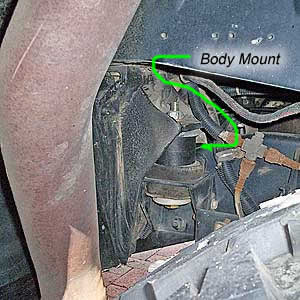
 Front Left Body Mount |
 Undo the Fuel line to the engine near the Bell Housing |
 Rear Right Body Mount Near the fuel filler hose |
 3" Rear Right with the Filler Hose Removed |
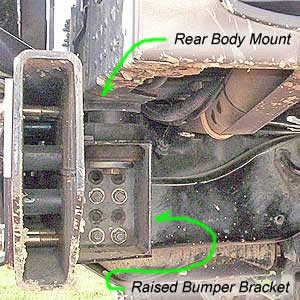 Rear right Near mount showing Raised Bumper |
 Rear Left near Exhaust Pipe |
 Steering Shaft Hole in Firewall viewed from inside Steering Shaft Hole in Firewall viewed from inside |
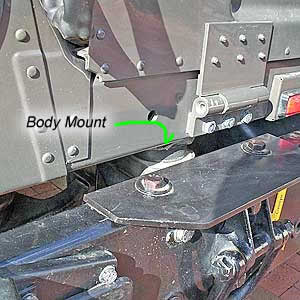 Rear left body mount Near Bumper showing step plate |
Basic Steps:
- Chock the wheels since you may need to put the transmission case in Neutral to easily access the linkage.
- Remove the rear bumper as you will want to raise it later. Removal makes the lift job easier and you won’t bump your head on it.
- Open the shift linkage boot and disconnect the transmission and transfer case linkage. Easy to do if not rusted.
- Remove the oil filter; it makes access to the front driver body mount easier. You needed to change the filter anyway.
- Remove the steering shaft boot that seals the shaft as it exits the body. It’s above the gas pedal. We had a frozen bolt that needed to be cut out. As you raise the vehicle, you may find the need to cut a bit of the firewall. It’s easy.
- The metal fuel line from the fuel tank is connected to the metal fuel line on the engine with a short rubber fuel hose and a couple clamps located underneath the top left of the bell housing (front of the transmission). Disconnect one end before you lift the body or you will strain the connection. After the lift bend the metal fuel lines so they line up.
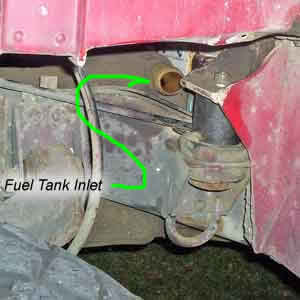
- Remove the fuel tank filler tube and disconnect the vent line using a 13/16” wrench.
- Remove the Rear drive shaft because it's in the way. Mark the shaft and the differential so it goes back together the same way because they are balanced. Put masking tape around the u-joint cups to prevent the needle bearings from spilling out.
- Disconnect the fuel vent lines from the T connector near the back of the main tank and the front of the tank using a 7/8” wrench.
- Remove the 2 bolts from the gas tank brackets and lower the tank onto a couple of milk crates or jack stands. The tank wouldn’t drop on the ’93 as the gas line was attached to the frame rail via an inaccessible clamp. I soaked the clamp with WD40 and disconnected the gas line at the coupling 2’ towards the engine from the clamp. I pulled some slack line through the clamp and the tank dropped.
- Remove the four hangers (2 require 9/16” socket, the other 2 use a T fitting which when turned allows the bracket to drop out.
- Remove the fuel tank fill spout and remove the breather hoses.
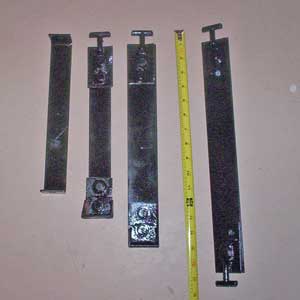
- Fabricate four longer vertical tank hanger straps 2" longer.
- On the ’99, removal of the front (right) passenger wheel makes the lift block installation much easier. This isn’t necessary on the ’93, there is plenty of room. The mount is hidden behind the heater core hoses. Remove the wheel only when it is time to insert the lift block. Use jack stands. This bolt is the only one that “drops in” from the top.
Additional Notes:
After loosening everything, I lifted one side of the vehicle at a time using two floor jacks and jack stands. One jack stand near the front passenger door, and the other pushing a 2x4 vertically against the rear corner of the body. It lifts easily. While lifting, observe the steering shaft from the driver’s compartment as it pokes through the firewall. See that there is no binding. Be careful where you put your fingers as you insert the blocks as the vehicle body could shift or fall. I reused the large frame “grommets” and thick metal washers.
Don’t tighten any bolts until all the blocks are installed.
The fuel filler hose connects to a 2” diameter, 6” rubber hose that allows fitment to the fuel tank. A two-inch lift causes minor headaches in the line up. The 3” lift will require a Z-shaped rubber hose. Take the hose to NAPA and get one with the appropriate bend in it.
I fashioned 2 spacer shims out of outdoor wolmanized plywood and bolted them to the body so they wouldn't move around while off-roading.
With the tank lowered the vent tubing (top of tank) which went through a body bracket will no longer reach so I just ran it across the top of the tank. Use a 13/16” wrench. Disconnect the coupling and remove the ferrule on one end.
I removed the vertical tank straps and cut the ends off leaving each of the 4 ends about 2" in length. Went to Home Depot and bought 1/8" x 1.5" metal strap and fabricated straps with 2 bolts in each end and 2" longer than factory. Primed and painted, installed with existing rubber padding. Bolts off the straps raise or lower the tank, I adjusted them so the drive shaft is properly centered. Keep the straps against the passenger rail as much as possible to give the drive shaft maximum clearance.
Going to a 3" lift is easy although you need to check the lines that go from the body to the frame - specifically the power steering lines to the gearbox and some fuel lines below. I also had to remount CTIS T-fiting in the rear driver wheelwell. In addition, I had to redo the hose to the gas tank to get around the middle passenger mount. I just cut the filler tube and used a 2' line of 2" fuel filler hose from NAPA. Its actually better than stock - a nice smooth run.
Rust:
My ’99 is rust free and it was easy to remove and reinstall the necessary bolts. The ’93 was a major headache. Bumper bolts broke and got stuck in the bumper and the transmission/transfer case linkage needed to be put in a vise and torched/wd-40’d to loosen. When you reassemble apply anti-seize compound to these parts.
3" lift by Steffen on a 1992LE:
- There will be trimming around the stearing shaft
- I couldn't get the orginal fuel hose (short piece) to fit. So I bought a long piece ($ 40 at checkers) cut that in half and cutted a bit (couple of inches maybe 6 or so) of the steel fuel tube. And replaced that with the piece flexible fuel hose.
- I had problems with the front driver side frame bolt. Frist to get them in a then the bolt was a little to long and was hitting the frame. Next time I'll measure the old bolt add exact 3 inches to it and cut the rest. After looking in the parts manual I found out that nearly all the bolts which hold the body in place have a different lengths. But only the one in the front matters.
- I did NOT used sythetic wood as the spacers for the hood. the local metal supply has 4x4 aluminum bars and cut 2 - 3 inch pieces for around 50 bucks total.
- I did use plastic as spacers between tank and body for $12 bucks from a local plastic supply.
- I looks like the 3 inch body lift is the max without changing brake hoses etc.
- You may have to trim the bolts sticking out at the rockers so they don't hit the tire.
Steffen Zimmerman's Truck
I gained 3 inches with the body lift except for frame and hub and almost an other 3 inches with the tires. The Rockers are more than 22 inch of the ground and the frame under the diffs is around 19 inch off the ground. The tTires don't rub on street use not even in tight corners. It was a good decision to use the little smaller IROKs (just 14 inch wide and 41.5 tall) than the TSL (real 42's and 15 wide)`
More Notes from Rick:
I finally finished the body lift on my truck about twenty minutes ago and I am here to tell you the Heineken is tasting great. After the second lift I think I actually learned some things. The longer straps they send you in the kits are crap, all you need are some really long grade 8 lag bolts and the OEM straps. That way you can have way more control over the finish height of the fuel tank. The drive shaft lined up perfectly this time with no trouble.
The steel fuel filler tube needs to be cut 8" and fitted with that rubber fuel filler hose with the steel rod in it so you can make it go right where you want it. Without the crimp on the end of the tube it's probably a good idea to double band clamp it. This may not be necessary on other model years but on mine the steel filler tube was sitting right on top of the middle right body mount, thus not allowing the tank to drop down into position.
One thing I learned from the first lift was to leave the body mount bolts in the holes after you break them free unless you want to really get frustrated lining up the holes for the new bolts. You can leave the two front bolts in the holes since they come in from the top and temporarily install the new longer bolts in the four rear body mounts. Then you just have to jack up the body, not the frame and install the pucks.
The firewall mod for the steering shaft was a breeze this time. Just give the aluminum on either side of the shaft exiting the interior a whack with the end of a crow bar and an 8# hammer and you are done with that part. Then crawl under your truck and using a die grinder, notch out the flange under the shaft.
