
Rebuilding a Hummer Differential
Updated February 4, 2014
Why do a rebuild?
Read this Before You Start
Other then a catastrophic failure where all the internal gears are destroyed most rebuilds are performed because the differential is either leaking or has excessive free play. I've known of a number of Torsen differentials getting fried when the owner puts 2 different size tires on one axle and drives on the street. This causes the torsen gear set to constantly bind, overheat and destroy itself.
Drive train Noise:
Differential failure is almost always a bearing, and the noise would be a rear-end rumble (which could come from the rear diff, of course). It's actually rare for a clunk/ clank to be from the differential. A clunk implies that there is excessive play and the only place that much play could come from is the ring-pinion gear interface. Again, once it starts to go out, the noise will also be a rumble, not a clunk. Noises travel well, especially in things like the rear end, so locating the actual noise can be tricky.
Most clunks are due to either U joints failing, or a problem with the axle shaft CV joints or center bearing. The clunk noise is saying there is too much free play somewhere, while a bearing failure, with its characteristic rumble, usually doesn't cause a clunk.
Noisy rear ends can go many thousands of miles before failing as long as the case has oil in it. What usually happens is that the pinion bearing fails and self destructs. This allows the pinion gear to thrash about causing incredible noise. It sounds like the world is coming to an end; and it is. Once the pinion gear fails it causes excessive play in the pinion shaft causing leakage at the seal. The differential then proceeds to drain itself in a period of a month or so. Once the oil is gone things quickly degenerate.
I've seen pinion gears that have had all the teeth sheared off completely. In one case, the ring gear was still in good shape, and might even have worked. Of course other damage resulted in having to replace the entire unit.
What I do to check the drive line is the following.
On a flat surface I jack up one corner of the truck under the A-arm to get the tire just off the ground.
I go under the truck and look at the half shaft as it comes out of the geared hub. I move the tire back and forth a bit and watch the half shaft. If I can move the tire and the half shaft doesn't immediately move I know I have free play in the geared hub.
Next do the same thing looking at the half shaft as it comes out of the geared hub. Watch the brake rotor. When I rotate the tire back and forth and the input side of the half shaft moves I see if the brake rotor is moving with the half shaft. If it isn't the half shaft has free play You might want to grab the rotor and move it while watching the half shaft at the hub.
Next I put a screw driver in the U joint on the input side of the diff and try to turn the diff. If the U joint is bad you will get free play/ wiggle in the joint. You can check all the U joints this way.
Then I chock the wheels that are still on the ground and put the tcase in Neutral. If you don't chock the wheels the truck will roll. I rotate the drive shaft watching for free play in the U joint as it enters the diff. As you turn the drive shaft watch the brake rotors for movement. If you can turn the drive shaft back and forth a bit and don't see movement in the output / rotors then you have free play in the diff. You can grab the rotor and drive shaft and move both to detect free play
It's not unusual to have some free play Only experience will tell you if there is too much. If you do all 4 corners you should find differences. If you find one diff much looser then the other then you may have a problem. If one half shaft is tight and another has 1/4" of free play then you need a new half shaft
I've found that new half shafts don't have any discernible free play. Half shafts on high mileage trucks may have a little bit of movement. U joints shouldn't have any free play Geared hubs have a little detectable free play Diff's seem to be a big variable. In my opinion the tolerance of the diff's from the factory is pretty loose.
The following tools will be needed:
- 9/16" (preferable T-handle - Snap-on RTB-18 about 32.00)
- 15mm open end (ratcheting preferable)
- 1 1/8" socket
- 15/16" socket
- 5/16" socket
- ½" socket
- Electric / Air impact
- ½" Ratcheting drive
- ¼" Ratcheting Drive
- ½" Torque Wrench capable of reaching 150 ft-lbs
- 3/8" Allen
- ½" Breaker Bar
- Thread Locker Red
- Thread Locker Blue
- 85W-140 Gear Oil. 2 qts per diff
- Teflon Tape
- Drain Bucket
- Permatex Gasket sealant
- Floor Jack
- Jack stands
- Hammer
- Screwdriver
- HMMWV Torque List ---
- Part numbers are located at the end of this article
- 1 extra set of helping hands
Part Numbers:
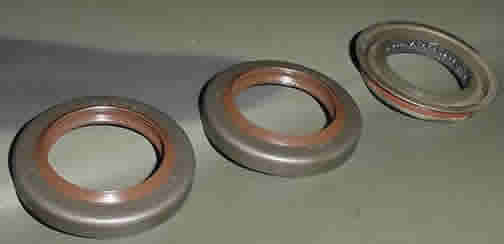
- Input Seal AMG Number - 5579448
- National Seal Number - 43065
- Output seal AMG Number - <6009472
- CR Seal number - 48675
- Oil retaining seal AMG Number - 5939517
- Seal installer tool AMG Number - J-38869
- nord lock washers for the rotors / half shaft
Work performed on a 1998 Hummer and a 1987 Humvee both with Torsen T-1 differentials
Remove the diff from the truck and remove the caliper mounting brackets with a 15/16" socket. After the caliper mounting brackets are removed, remove the differential cover bolts with a ½" socket.

Caliper mounting brackets with the ring cover off
Clean the ring cover surface on the differential and on the ring gear cover. Clean the area around the input and output seals and remove the seals with a seal remover or a screwdriver. Be sure to NOT score the housing where the seal is to be seated. Clean the differential housing as needed.
Install the input and output seals with the seal tool from AMG, or with a block of wood. Be sure to seat the seals straight and even.

AMG Seal Instillation tool with seal installed on it (PN J-38869)
Check the output shafts for excessive play between the output shafts and the input shaft. If the play is excessive take it to a qualified shop to get the backlash set unless you have the skills and tools to setup a rear end yourself.

Torsen Differential with Ring Cover removed
Installation:
Once the seals are installed and the surface where the ring-gear cover seats is clean (carburetor or brake cleaner work well but be cautious. Use Permatex sealant ultra gray. Let the sealant sit for 10 minutes before installing the cover. Install the ring gear cover bolts snug, but not tight. Allow the sealant to harden somewhat before you fully torque the cover (45 Min or longer). This will give you a "gasket" between the mating surfaces. Torque the bolts tight to 16 ft-lbs or until hand tight.
Install the caliper mounting brackets with thread locker red to 125-150 ft-lbs (these bolts have a tendency to back out and give your brakes a lot of slop - I would advise the higher end of the spec). Now the differential is ready to be reinstalled into the truck.
Replace the input seal:
When the tail shaft is removed mark the pinion shaft, nut and flange so that they can be put back in the same place. To lock the pinion flange I use a length of 2"x 2" x 1/4" steel angle iron with two holes drilled in it to attach to the flange. You will also need to take a piece out of one of the sides to allow the socket to fit over the pinion nut. This angle is used to lock the pinion by jamming it against either the floor or chassis rail, depending on whether you are tightening or loosening the pinion nut. Undo the pinion nut and remove it along with the pinion flange. Remove the old seal; fit the new seal using a piece of timber and hammer and fill the V groove of the seal with grease. If the pinion flange shaft looks a bit rough clean it up with fine (600 +) wet and dry paper. With a bit of light oil refit the pinion flange lining up the marks made previously. Fit the locking angle bar and tighten the pinion nut until the marks you made on the nut, shaft and flange line up. Do not tighten the nut past this point as you will overload the pinion bearing and destroy it very quickly. Next install the input yolk. When installing the nut put a coat of the Permatex on the perimeter of the bolt (to stop fluid from coming out the spline) and then use your impact to torque it down.
Replace the Pinion Seal
It can be replaced with diff in the truck.
You will need a torque wrench (beam type, not click type) that reads in inch-pounds. Usually a 1/4" drive is used. It is not necessary to open the diff to do this repair.
You will need to disconnect both half shafts and the drive shaft. Take the torque reading - how much torque is required to turn the diff input yoke. Remove the nut & yoke, keeping track of the number of turns on the nut. Replace the seal, reinstall the yoke and the nut.
Tighten the nut until the torque required to turn the yoke exceeds the original reading by a small amount (details in the service manual). Hook everything back up and you are done.
Fixing a Leak
I am having a problem with a rear Differential. It's leaking from the input side (drive shaft side). I have tried to see if it is leaking from outside the yoke, or coming from where the yoke nut is tightened to the yoke. I believe it may be coming from the latter. I do have some spline seals (black) but don't know if they are the right ones or not. How can I tell? Should I replace the outer seal at the same time? Are special tools needed? How tight should I make the yoke nut?
Before undoing anything mark the tail shaft, yoke, pinion shaft and nut. Then you can reassemble everything back to the same point/ tension. If you are going to undo it all at home I'd replace the outer seal as well. If it is a side of the road job just do the spline. If you don't have a spline seal, smear some Gray or Black Ultra gasket sealer on the back of the nut/ washer instead. When assembling, never tighten the nut any tighter than it was before, just do it up till your marks line up otherwise you will over tighten the pinion bearing which will lead to failure.
I made a tool which is a piece of 1 1/2 " x 1 1/2" x 1/4 angle iron with a V in one side to clear the pinion nut socket used to undo it and two holes to attach to the yoke to hold it while undoing/ tightening the pinion nut.
