
Changing Tires on Hummer Wheels
Drawings from the AMG Service Manual
Updated September 21, 2017
How to Change a Tire on a 16.5" 2 Piece Wheel
Note: The new 17" 2 piece aluminum wheels are very similar except the 20 wheel bolts get torqued to 50 ft/lbs and then finally to 75 ft/lbs. BALANCING MUST BE ACCOMPLISHED WITH STICK-ON WEIGHTS ON THE INSIDE OF THE WHEEL. DO NOT USE CLIP-ON WEIGHTS ON THE OUTER SIDE OF THE WHEEL.
Parts/ tools you may need:
Air wrench
Torque wrench
Pentagon Socket
Run flat compressor
Run flat grease
Wheel O' ring
Hex nuts (locking style)
Alignment washers
Wheel air fitting 'O' ring
Lug nuts
There are 2 styles of steel 12 bolt 2 piece wheels. A new wheel design came out in 2000. It uses a different red 'O' ring.
 1. Remove tire from truck.
2. Ensure ALL air is out of tire. You can remove the tire valve core or just take the CTI fitting off. This lets the air out much faster. Very important.
3. Remove the plastic caps (on newer wheels). Take off the outer rim by unscrewing 12 outside lugs. Any signs of air leaking go back to step 2 immediately!
4. with outside nuts off, carefully separate outer rim from the inner. I soak the bead area with WD-40 and pry the top off the tire. Sometimes you can just step on the tire to break the bead.
5. Remove tire from bottom rim. Sometimes it just lifts off, otherwise I put the wheel in a concrete block stud side down, soak the bead with WD-40 and push the tire down and off the rim.
6. with old tire off you can now check to see what's in the tire. If your wheel came from the factory it will either have a Run flat or beadlock. If it doesn't have anything this means that someone has already worked on the wheel (see following article). A beadlock is a 1 inch thick round cylindrical rubber ring. Note the notch which lines up with the air stem when installing a tire. The beadlocks flex and come out very easily.
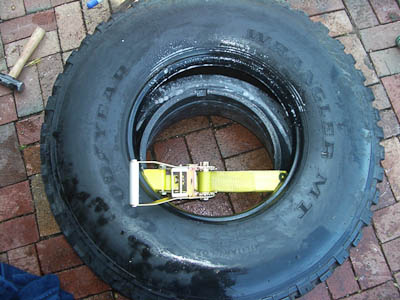
Runflats are another story. They will be similar to beadlocks just much thicker like a big donut with a hump. You can't get these out w/o a Run flat compressor tool. You can try the homemade one's such as a large ratchet strap. This isn't easy. Don't expect to get them out easily. The real Run flat compressor may be required.
Tip: To install the runflat, I did use a 20,000 lb ratchet strap and a 4 foot pry
bar to get the torque needed to ratchet it enough to compress the runflat to
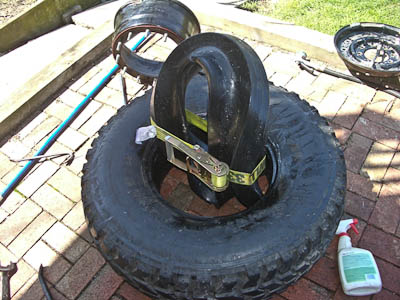
about 5 inches apart. Then, to get the runflat into the tire, I did
something no one ever mentioned so far. I took a coil spring
compressor and reversed the jaws and nuts. I then placed this into the tire
and opened the tire very wide to allow the insertion of the runflat. It
only took one reversed compressor to do this but I have 3 more just in case.
It did take two pry bars to help pass this huge hunk of rubber into the tire.

7. Clean all the parts.
Remove the wheel weights and the large 'O' ring. Make sure that you clean the 'O' ring groove. I use a wire wheel on a drill for this. If the 'O' ring is damaged replace it.
 Check to see if the air valve fitting is tight. These fittings have a flat thread area that fits into the wheel and seals with a little 'O' ring.
There are 3 alignment washers that need to be in good shape. If they are smashed or distorted replace them.
Inspect the 12 wheel studs and replace any that have damaged threads etc. If you have a broken stud replace it and the 2 that surround it. Take a wire wheel and thoroughly clean all the dirt and paint off the threads.
Inspect the 12 wheel stud nuts. If you had an old wheel that used the pentagon nuts replace these with factory hex nuts. The nuts are lock style and should thread onto the stud a turn or two and then get very tight. If they don't do this replace them. Only use the factory part or an equivalent.
If you are permanently removing the runflats clean all the Run flat grease out of the tire.
Assembly:
1. Assembly is the reverse procedure.
If you are using runflats make sure you put Run flat grease on the inside surface of the tire. Put a Run flat or beadlock in the new tire. When you drop the tire over the lower rim rotate it so the notch that is cut into the beadlock falls between 2 studs. This will ensure that it will eventually line up with the air stem on the top wheel half.
Put the 'O' ring in the lower wheel groove. I coat the 'O' ring with some grease.
Put a dab of grease or antisieze on the lower 3/4" of the 12 wheel studs.
Place the top rim into the studs lining up the fill valve with the groove in the beadlock. Make sure you have the alignment washers in place over 3 of the studs equally placed around the circle. I put a dab of grease on the top surface of the wheel where the nuts will contact as they are screwed down. This keeps the paint from getting ripped up and makes for a more even torque.
First I screw the nuts down evenly without tightening them. I make sure that the alignment washers are seated in the top part of the wheel and slowly snug up the 3 studs with these washers. This will bring the top plate down. As the top plate comes down I screw down the rest of the nuts to the level of the plate without tightening. I then snug up the 3 nuts where the alignment washers are. This ensures that the wheel halves come together lined up. Then tighten the 12 nuts in a crisscross pattern using a torque wrench. First bring them to 100 ft/ lbs. Then tighten them again to 120 ft/ lbs.
Screw the CTI fitting back into the wheel air fitting.
Air up the tire to 30 psi and check for leaks.
Balance and mount back on the truck. I put antisieze grease on the wheel stud. If a lug nut is tight going on replace it. The studs are made of very hard steel. The lug nuts are made of softer steel. When a lug nut is over tightened the threads distort. I always tighten the lug nuts by hand. This ensures that they are not over tightened and I can get them off again. I'm always thinking ahead. I don't want to be stuck with a flat and not be able to get the lug nuts off.
If you have beadlocks figure 1 hour easy for each tire. Runflats could take twice the time.
How to Break the Bead and Change a Tire on a One Piece Wheel
You need a Highlift jack. Take a tire and let all the air out by removing the valve core. Place the tire/wheel on it's side under the rear bumper. Spray some WD40 all around the bead area. Put the jack bottom on the bead of the tire as close to the wheel as possible and jack against the underside of the bumper. This will push the tire down and break the bead loose on the wheel. You may need to rotate the tire around to work it all the way off.
Then take a couple of pry bars / screwdrivers and pry the bead up and over the wheel. You will see the runflat now. Unbolt both sides of the runflat and pull them out of the tire. You can now pry the bead back down under the wheel.
Too get air in the tire you have to reseat the bead. It maybe difficult because the bead and tire are heavy. You could try to seal the bead by laying the assembly down and placing some blocks on the underside of the tire. Stand on the wheel and try to inflate the tire. You could also try to tie a strap around the wheel and twist it tight like a tourniquet. Once you get some air in the tire you are home free. Now you have to get the tire balanced at a shop.
Is Removing Runflats from 2 Piece Wheels Safe?
A point regarding the need for runflats is *exactly* the act of driving at highway speed. You are at MORE risk. Most people don't realize this. If you have a blowout, certainly not an unheard of experience with some of these tires that are being used on Hummers, and you are running 15 degree bead angle, 16.5 inch rims you will in all probability lose the entire tire right off the rim if you do not have beadlocks or runflats. Slow off roading will not kill you if you hole a tire without a beadlock.
The 16.5 inch wheel had a 15 degree bead angle instead of 5 degrees to make it easier to mount tough light truck tires with a tire machine on a one piece design rim. The problem is the while making it easier to put the tire on these wheels, it allowed it to come off easier too. There is no safety bead design to these rims. The beadlock or Run flat works great at retaining the tire.
Another Opinion
Tom Cepek Says:
First let me say that there is nothing wrong with running two piece wheels without the beadlocks, and the only problem that may occur, will solely be a function of air pressure.You must keep a reasonable amount of pressure in the tire to assure it will stay on the rim.
Keep in mind that the 16.5 Super Single type tires have been around for about 40+ years, and the wheels made and designed originally for those tires were not built with any type of on-wheel or inside the wheel bead lock to hold the tire in place. They were a load capacity type tire made for things like the F-250 Camper Special used for carrying slide in campers or for carrying heavy loads and not for running in the sand or off-road at low pressure settings.They were never designed for a vehicle that would lower the pressure either, that is until the Hummer arrived on the scene.
When I built the first aluminum wheel for the Hummer in 1994, I designed that wheel with oversized safety beads on the rim to hold the tire in place at low pressures, without the need for an internal beadlock.Since most 16.5 wheels are made with a 15 degree angle bead seat (as opposed to a 5 degree bead seat on the 17" wheels), and generally without any type of safety bead, that angle has a propensity to allow the bead of the tire to come loose if run at low air pressures since there is nothing but friction, bead tightness at the bead seat and air pressure to hold it on the rim.
The lower the pressure the more chance there is for the tire bead to move and allow a side motion such as turning the vehicle, hitting a tree stump, rock or other object that would push the sidewall of the tire inwards and allow the air pressure to escape.
If run in the sand at low pressure you also have a chance of the sand imbedding itself between the bead, rim flange, and bead seat, which can allow air to leak out which can lead to running the tire off the rim. The same thing applies to mud, snow, dirt, or any other material that can work it's way between the beads. If that happens, then the tire will usually end up off the bead seat, and you'll be running it flat.
The minimum air pressure that I recommend running on 16.5 tires is about 20 PSI and at that pressure, I've rarely seen a tire come off the bead and lose pressure, but that doesn't guarantee that you can't dislodge the tire at that pressure.
In short, there's no reason that you can't run the two piece wheels without the beadlock, you just need to keep the air pressure up.
Can I use Old Magnesium Runflats in Newer 2 Piece Wheels?
The Gross Vehicle Weight Rating (GVWR) of the vehicles is the difference. Magnesium runflats were designed and tested for used in combination with bias ply (Goodyear RTII) tires for HMMWV/HUMVEE's of 7,700, 8,660 and later retested and certified for the 9,100 lb. GVWR M997 Maxi-ambulance. All H1's are either 10,300, 10,800 or 12,100 lb. GVWR, have higher load capacity (12 bolt) wheels, radial tires, rubber composition runflats and a different formula Run flat compound for that combination.
PS: The AMG part number for the H1 (6 sided) 1/2-20 wheel nut is EC12339501.
They are NOT off-the-shelf nuts, but many off-the-shelf nuts do look similar.
Mixing 2 Piece Wheel Parts
I have been told by personnel who represent AMG that you can use the earlier style 12 bolt front half on a newer style 12 bolt rear half two piece wheel.
The newer style wheel no longer uses the centering washers so if you are using an earlier front half, you will have to use the centering washers.
